Friday, January 31, 2014

Monogram cards gift set


I enjoy making card sets as gifts. Especially monogram note cards. I made this simple folder to hold 6 cards and 6 envelopes and decorated the outside with papers matching the cards inside.


Here are the note cards. I took my design inspiration from these pretty cards, and switched up the colors and added some seam binding. I love the finished set. I had some strips of card stock and patterned paper left, so I embellished the envelopes.

For this card set I used CTMH card stock in Colonial White, Pacifica and Lagoon. I used CTMH ink pads in Pacifica and Lagoon. I used CTMH retired patterned paper from Magnifique, retired Monogram L stamp and retired SOTM Baroque Borders.


Find inspiration everywhere! Go... Create something fun & fabulous. Enjoy!

Wednesday, January 29, 2014

Crocheted spa cloth & face scrubbies


I had made a set of these face scrubbies back in November and have been using them with this DIY facial cleanser every morning since. I love them. I rinse and allow them to dry and then place them back in the container with the liquid cleanser. I throw them in with my laundry every other weekend or so. Now we are putting together a spa basket for a raffle type fund raiser at work, so I made a set of 3 of each to add to the basket. The facial scrubby pictured on the left is crocheted from this pattern, and the makeup removers pictured on the right are created following this pattern. For the sets I am using personally, I followed the patterns exactly. But now that I have been using them for months and washed and dried them I realize they are getting a bit loose and floppy. So for this new set, I added a slip stitch all the way around the edge to firm and tighten it up a bit, in the hopes that they retain their shape a little bit better.


I crocheted this yummy little spa style wash cloth from this pattern that I embellished a little by adding a single crochet row all the way around the outer edge. The finished size is about 6 x 6 inches. I crocheted these using Bernat Handicrafter cotton in By The Sea color.


Here they are wrapped with some jute twine. I added a tag I printed on the computer, punched out and then added some rubber stamped shwoopies for decoration. These are ready for addition to the spa basket. 

Find inspiration everywhere! Go... Create something fun & fabulous. Enjoy!

Monday, January 27, 2014

More Crocheted Coffee Cozies


A few more coffee cozies I have made and given away lately. These are such fun project to use up scraps and create wonderful gifts. Above I used a navy blue and bright blue and a shiny white yarn.  
 
Purple and white stripes with picot edge only around the top, as specifically requested by the recipient. She was concerned about it fitting in her cup holders in her car. It's fun to change them up and personalize them specifically for friends. 


A navy and black striped one with a small scallop edge at the top and bottom. 

And my final purple and ivory stripes with a picot edge at the top and bottom. 


Find inspiration everywhere! Go... Create something fun & fabulous. Enjoy!

Saturday, January 25, 2014

Valentines Love Decor


Some upcoming holiday decor. Valentine's day is coming up. I created this using four 5x7 inch Dollartree frames. I removed the glass, I used book pages for the background and I cut the letters on my Cricut using the Storybook cartridge.


These close ups show the layers and the beautiful sparkly shwoopies.


I also added some layers of flowers and pearls. The frames are hinged together simply with strips of paper folded down the center and taped to the edges, so it stands nicely but it wont actually fold in on it self for nice storage. There was not enough area to tape on the back side of the frame to make it fully hinged. 


Find inspiration everywhere! Go... Create something fun & fabulous. Enjoy!

Wednesday, January 22, 2014

Fallen leaves slouch hat & crochet wrist warmers


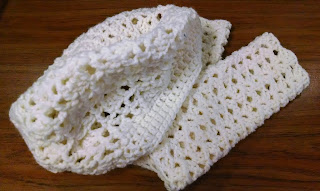
I recently finished this hat and wrist warmers set for a friend. I followed this complex pattern for the beautiful hat. It did finally turn out beautiful, but not before I pulled it out and started over probably 5 times. I would not be lying to say this is the most detailed pattern I have made. I am thrilled with the finished project.


Here is a close up of the wrist warmers. They were made following this pattern. The finished wrist warmers are delicate and lacy and a quick project. Both of these where crocheted using Loops & Threads Impeccable yarn. I really do love working with this yarn, it is easy on the hook, not splitting or knotting and it finishes to a soft touch while holding its shape.


This is a quick snapshot of the hat on my head right after I had finished crocheting. I like to take a snap to be sure it sits nice and has enough slouch before I cut my yarn and weave in the ends.


Find inspiration everywhere! Go... Create something fun & fabulous. Enjoy!


Saturday, January 18, 2014

More knit ruffle scarves


A bunch of new to me ruffle yarn, I have never seen these locally in stores. I ordered them from Herrschner's it's called Department 71 Parisian. It's excellent to knit with and I love the finished look. It reminds me of coral and the color combinations are yummy. Thankfully Herrschner's was having a very nice sale on the ruffle yarns and I picked up 2 or 3 more skeins in different colors. 


This is Sundance Mini Frill. It's much smaller in width than regular ruffle yarn but it knits up full and lush and really cute. If they had it in a more adult color line I would order more. As it is, this one was knit for a donation but I will be making myself one in this hot pink color combo.


Here it is next to regular Sundance Frill Metallics (I think. I have worked with so much ruffle yarn lately I am starting to lose track, but I'm pretty sure) so you can see how its narrower, presumably for a child's dimensions, but I like enough that I would wear it too. 


Find inspiration everywhere! Go... Create something fun & fabulous. Enjoy! 

Friday, January 17, 2014

Kraft cards with pigment inks


My cards today were inspired by this card idea. As you can see I couldn't find flowers very similar and so even though they started with the same intent, they turned out very different. But still a fun project with a decent ending. I will save you the pain of seeing the failed attempts. There were a few, before I got some good color combinations and good stamps. I will just let you know CTMH pink or yellow pigment inks do not show up on kraft paper and outline flower stamps do not show up very good either. 


Here is my favorite of the bunch. This is stamped with CTMH Hello Blooms, Heartfelt Treasures and Heart to Heart, Everyday Life and Avonlea Cardmaking Workshop Flair in Mini Pigment Pads Enchantment inks.
The white is SU! Craft ink pad. The CTMH White Daisy ink pad was a weak, pale, fail next to the bold pigment inks, unfortunately.  


These are all the same stamps in CTMH Mini Pigment Pads Adventure set. 


And last but not least, this one was created using the same stamp sets with the addition of the lil flower being from the Cricut Artiste Collection stamps in CTMH Mini Pigment Pads Whimsy set. This one reminds me of the ocean, of starfish and sea weed and bubbles. I like it, it is serene. I will confess it was addictive stamping the little filler flowers and the two different tiny dots all around. I may have over done it just a bit. ;D

It was fun for me to finally bust out these pigment ink pad sets, and most are really bold on the darker card stock, with the exception of the pinks and the yellows.  

I rarely do a flat single layer cards any more. While these will be great for mailing I can't help but feel they would benefit from some gems or ribbon or twine. But I stuck with the sample cards inspiration, only deviating in spritzing with Glimmer Mist in Pearl. 


Find inspiration everywhere! Go... Create something fun & fabulous. Enjoy!

Thursday, January 16, 2014

Crocheted fingerless mitts


These yummy little beauties are created from the pattern I found here, in a wonderful clearance yarn I ordered from Herrschner's called Premier yarns Angel in Grape Freeze. It says its a #4 medium weight yarn, but it is softer and finer than most I have ever worked with. It is really nice to work with and even nicer to wear. I still have part of the skein left so I might have to whip up a matching ear warmer or something.

I just can't get enough yarn and crochet in my life lately. It really is such a calming and satisfying hobby. 


Then I made these from the same pattern. I grabbed a partial skein of Caron Simply Soft Paints and a hook on the way out the door for a Sunday afternoon drive up to Emigrant Gap. A little over one hour drive up and one hour drive home and I had finished this pair. This pattern is very simple but finishes up to such a cute pair of girly gloves. I love it. 

Find inspiration everywhere! Go... Create something fun & fabulous. Enjoy!

Sunday, January 12, 2014

Crocheted slouchy hat and keyhole scarf


I crocheted this hat and scarf set for my mom, for a Christmas present. Here she is modeling the set on Christmas morning.

I made these using Two skeins of Charisma yarn in Holiday color in the wonderful Wafflecone Slouchy hat pattern pinned here and the Keyhole scarf pattern pinned here. Thank goodness for Pinterest organizing and storing all these patterns for me because I know I will be making these projects again and again. 


Find inspiration everywhere! Go... Create something fun & fabulous. Enjoy! 

Friday, January 10, 2014

Crocheted tam and fingerless gloves


I am so far behind on posting completed projects. I actually made this set for my friend Ang, back in November. I am so glad she loves being my model and guinea pig for new patterns. 


This slouchy hat or tam as the pattern calls it, is made using this excellent pattern that I found on Pinterest. It's an easy pattern to follow and a quick project to crochet. I used Loops & Threads Impeccable yarn for this set. 


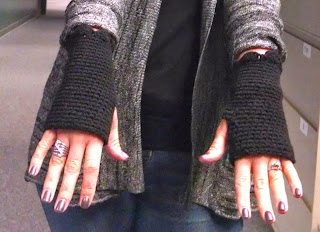
The fingerless gloves are a creation of my own. I didn't follow a pattern and I fit them specifically for Ang's hands, increasing and decreasing as needed. I found it really challenging and I was very happy with the finished product. I have made two more pair, personalizing them to fit my hands and even my sons hands. On Ang's and my pair I added a scallop to the top edge for a little more femininity. My sons are plain and functional, they come in handy when working in the barn or lounging around playing on the computer.


Find inspiration everywhere! Go... Create something fun & fabulous. Enjoy!