Tuesday, December 23, 2014

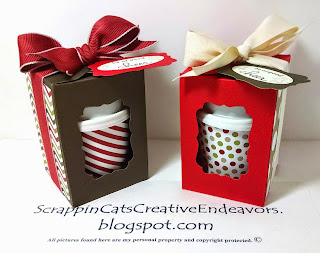
Mini coffee cup gift box


I was inspired to create these little thank you gifts by this pin on Pinterest. The designer of this box had a very basic measurement and instructions on her post. The first one I made I followed her instructions exactly. I found the box to be a little to big for my mini coffee cups, they moved and tipped inside the box. So with lots of trial and error, thankfully using ugly paper, I finally came up with a smaller box. The cool thing about this box is that you can slip a gift card down inside the box, between the mini coffee cup and the side with no window punched in it. 


My measurements for the box are 9 inch square of cardstock, punched and scored at 2 inches on all four sides, then flip the paper over and punch and score all sides at 2 inches again, using the envelope punch board. I cut along the score lines for 2 opposing sides, and for the remaining 2 sides I trimmed about .25 inches away from the score line (this is where you will place your tape to hold the box together). Then I used my SU! Decorative Label punch to make the windows on 2 sides.  I added some designer series papers to the plain sides and added my tag made from the Decorative Label punched pieces with a dimensional.  I didn't use any adhesive on the top of the box, just closing it with ribbon tied in a bow.

I found the template for covering the mini coffee cups here, although I did find it a little short for my cups, so i lengthened it by .50 inch to have a little more overlap for taping to the cup. I filled my cups with Hershey's Nuggets and Kisses decorated with matching designer series papers. 

Find inspiration everywhere! Go... Create something fun & fabulous. Enjoy! 

Sunday, December 14, 2014

Fun card swap


This card was inspired by this card on Pinterest. I needed to make 9 for a card swap I am participating in. This months theme is scraps. 


I had this gorgeous 6x6 stack, Autumn Song by Bo Bunny. So I let the paper be the punch and kept the rest simple. I made these cards to fit in a small business style envelope, so it measures 3.5 x 6.25 inches. I also lined the envelopes.


Find inspiration everywhere! Go... Create something fun & fabulous. Enjoy! 
Tuesday, December 2, 2014

2nd card buffet


These are my cards from our second SU! Card Buffet. This one was inspired by this Pin on Pinterest. I made minimal changes to the cute design. I did add some liquid pearl dots to the centers of the poinsettias.  


This one is basic, clean and simple as they say, but beautiful. I colored the pearls with alcohol markers to make them red. I followed this Pin design for my inspiration. 


I love SU! Festive Flurries and with Coastal Cabana and Lost Lagoon inks they are really stunning. I took my inspiration from this Pin, the basic design is the same, just change up the stamps and colors for a new feel. 


Anytime I get to use SU! Endless Wishes stamp set, it's a good day. This card is inspired by this card design, with small changes to make it my own.


And my final design, original design found here. It was so perfect I didn't hardly change a thing.


These are Tina's cards. Super cute gift holder inside.


And out. All wrapped up and ready to give.


Another adorable gift card holder.


Here is the inside, with the belly band removed.


Ahh, my favorite Endless Wishes looking beautiful in Cherry Cobbler and Crumb Cake.


Elegant glittering stars and stripes.


And Tina's final card, a Festive Flurries snowflake. Love that mirrored paper and bling.


Find inspiration everywhere! Go... Create something fun & fabulous. Enjoy!