Tuesday, December 23, 2014

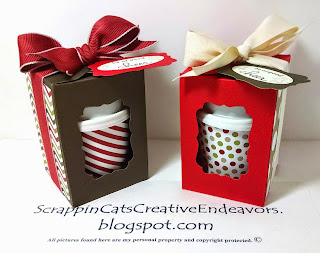
Mini coffee cup gift box


I was inspired to create these little thank you gifts by this pin on Pinterest. The designer of this box had a very basic measurement and instructions on her post. The first one I made I followed her instructions exactly. I found the box to be a little to big for my mini coffee cups, they moved and tipped inside the box. So with lots of trial and error, thankfully using ugly paper, I finally came up with a smaller box. The cool thing about this box is that you can slip a gift card down inside the box, between the mini coffee cup and the side with no window punched in it. 


My measurements for the box are 9 inch square of cardstock, punched and scored at 2 inches on all four sides, then flip the paper over and punch and score all sides at 2 inches again, using the envelope punch board. I cut along the score lines for 2 opposing sides, and for the remaining 2 sides I trimmed about .25 inches away from the score line (this is where you will place your tape to hold the box together). Then I used my SU! Decorative Label punch to make the windows on 2 sides.  I added some designer series papers to the plain sides and added my tag made from the Decorative Label punched pieces with a dimensional.  I didn't use any adhesive on the top of the box, just closing it with ribbon tied in a bow.

I found the template for covering the mini coffee cups here, although I did find it a little short for my cups, so i lengthened it by .50 inch to have a little more overlap for taping to the cup. I filled my cups with Hershey's Nuggets and Kisses decorated with matching designer series papers. 

Find inspiration everywhere! Go... Create something fun & fabulous. Enjoy! 

Sunday, December 14, 2014

Fun card swap


This card was inspired by this card on Pinterest. I needed to make 9 for a card swap I am participating in. This months theme is scraps. 


I had this gorgeous 6x6 stack, Autumn Song by Bo Bunny. So I let the paper be the punch and kept the rest simple. I made these cards to fit in a small business style envelope, so it measures 3.5 x 6.25 inches. I also lined the envelopes.


Find inspiration everywhere! Go... Create something fun & fabulous. Enjoy! 
Tuesday, December 2, 2014

2nd card buffet


These are my cards from our second SU! Card Buffet. This one was inspired by this Pin on Pinterest. I made minimal changes to the cute design. I did add some liquid pearl dots to the centers of the poinsettias.  


This one is basic, clean and simple as they say, but beautiful. I colored the pearls with alcohol markers to make them red. I followed this Pin design for my inspiration. 


I love SU! Festive Flurries and with Coastal Cabana and Lost Lagoon inks they are really stunning. I took my inspiration from this Pin, the basic design is the same, just change up the stamps and colors for a new feel. 


Anytime I get to use SU! Endless Wishes stamp set, it's a good day. This card is inspired by this card design, with small changes to make it my own.


And my final design, original design found here. It was so perfect I didn't hardly change a thing.


These are Tina's cards. Super cute gift holder inside.


And out. All wrapped up and ready to give.


Another adorable gift card holder.


Here is the inside, with the belly band removed.


Ahh, my favorite Endless Wishes looking beautiful in Cherry Cobbler and Crumb Cake.


Elegant glittering stars and stripes.


And Tina's final card, a Festive Flurries snowflake. Love that mirrored paper and bling.


Find inspiration everywhere! Go... Create something fun & fabulous. Enjoy! 

Tuesday, November 25, 2014

A gaggle of turkeys


I'm making little turkeys to put at the place setting of each of my family members, at Thanksgiving dinner. I was inspired by this adorable pin on Pinterest. I absolutely love this SU! Day of Gratitude stamp set, and this is such a clever way to use it. 


Here's a close up of my very first one, in all his glory. I used SU! inks as you can see, and the third pad is Cajun Craze.


I created a Pazzles cut file so I wouldn't have to fussy cut all those turkeys tails by hand. I cut and then stamp while the paper is still on the mat. I feel like it helps me to line them up a bit better. I didn't want to put a York peppermint patty between the body and the tail as the original creator did. I'm hoping these turkeys hang around for a lil while, not just ripped open for their candy and discarded. *gasp* So I repurposed the centers of my used ATG tape refills. I covered them with a strip of coordinating card stock and put some SU! dimensionals on both sides, strategically placed over the spokes in the plastic tape refill piece, to give the dimensionals added support. Then I sandwiched them between body and tail.

Thanks for visiting my blog today. I hope you have a blessed Thanksgiving filled with lots of love and happiness.


Find inspiration everywhere! Go... Create something fun & fabulous. Enjoy! 

Saturday, November 22, 2014

It's all about the wrap, gift exchange


This is quick and easy gift exchange present. A recycled jar covered in SU! Nordic Noel Designer Series Paper that I fussy cut around the roof lines before adhering it to the jar with scor-tape. I also wrapped some coordinating bakers twine around the top of the jar. I covered the IKEA tea lights with All Is Calm and Color Me Autumn Designer Washi Tape. And lastly I used a brown paper bag, trimmed down and embossed with Filigree Frame Textured Embossing Folder, as the wrapping. I stamped the Olive Green dots using the Wondrous Wreath on the bag and then stamped and die cut the wreath and adhered it over a banner or Real Red cardstock. Tie the package closed with Real Red ribbon and it is ready for the exchange party. 


Here is another close up photo of the gift set. I am excited to see what all of the other participants created. 

Find inspiration everywhere! Go... Create something fun & fabulous. Enjoy! 

Tuesday, November 11, 2014

Half granny square shawl


I made this. I am so excited. This is my first big crochet project completed. And I am thrilled with the finished shawl. Originally, this was my Pinspiration, I fell in love with the fall colors and soft lacy look of it. 


Sorry this is a terrible picture, but this is how I like to wear it. Draped around my neck and spilling down the front of me. I'm a show off like that. I can't help it, I am still so happy with every single thing about this shawl.

The pattern was very easy to follow and surprisingly quick and fun to work up. I used 2.5 skeins of Red Heart Super Saver yarn. Yes, I said Super Saver. When I finished I followed this tutorial for softening and blocking this shawl and it worked wonders. Washing and blocking improved the drape and softness immensely. I absolutely love wearing this, its so soft and comfortable.


Even though its huge, it's a very open stitch and so it wears very light and easy. Its not heavy and it just melts around my neck.


In homage to fall I made little clover shapes all along the outer edge. In homage to my recent Ireland trip I added one 4 leaf clover (see it there in the middle of the photo). I love this little hidden treat.


Find inspiration everywhere! Go... Create something fun & fabulous. Enjoy!

Friday, October 31, 2014

Halloween cards


This is one of my new Scrapbook Expo finds. The Stamps of Life thanks2fall stamp set and coordinating dies. Super dee duper cute. I came home from my local expo and played with them all that weekend. 


The Halloween patterned paper is from Basic Grey Eerie paper pad.


Add some card stock layers, pop up the pumpkins and add a little Queen & Co. bling and I'd say these are too cute to spook!

Find inspiration everywhere! Go... Create something fun & fabulous. Enjoy!

Saturday, October 25, 2014

My first SU! Upline meeting.


I had a great evening meeting some of my SU! upline and peers. We created some very beautiful crafts also. 


First we created this card using the new Wonderous Wreath stamps and Framelits set. Also we used the amazing gold and silver foil papers. Really gorgeous stuff.


Here we have an adorable fall vignette using Holiday Home stamps and Framelits set. 


This sweet luminary was made using vellum paper and the Curvy Keepsakes Box Thinlits. We stamped and embossed with silver ink and powder. It turned out very elegant.


This was the final project of a very fun technique class. Bubble wrap stamping, and in this case we stamped in Versamark and heat embossed with clear powder. Then we sponged over the embossing with 3 different inks. Super unique finished project. Loved it!

I learned so much in one evening, and I have been stamping and paper crafting for 20+ years. I am so excited for this fun new endeavor.


Find inspiration everywhere! Go... Create something fun & fabulous. Enjoy!

Friday, October 17, 2014

My first card buffet class


My long time friend and instigator of my love of paper crafting, Tina and I cohosted our first SU! Card Buffet. Well, it was my first, she has done many. It was great fun.

The two cards above were inspired by this and this pins on Pinterest. 


These are also inspired by this and this wonderful cards found on Pinterest.


And my final creation also a Pinterest find, here. I am so thankful for Pinterest. I see so many beautiful projects that I might never have found on my own.


These beauties are Tina's designs.


Sweet Halloween cards, so cute.


And a beautiful Thanksgiving card too.


These little gifts for our attendees were inspired by this awesome Youtube video that I saved to Pinterest. So easy to save and categorize wonderful projects for future reference.


Find inspiration everywhere! Go... Create something fun & fabulous. Enjoy!