Wednesday, September 14, 2011

Accordian top gift box

I watched an awesome YouTube video that showed how to make this accordion top gift box from altered SU! mini milk carton Sizzix die cut pieces. The video is by Stamping Maria, and I have pinned it here. After watching I made the first one from my copy of the mini milk carton on my Cricut. After I put it together I decided to alter my cut file so I did not have to cut off one side of the mini milk carton. I also added the decorative strip and the three Halloween cut outs to the new file.


This is what the box looks like when the top is opened. The box is approximately 3.5 x 1.5 when closed, I cut the Halloween shapes just a touch taller so they show over the top of the closed box.
The Cricut .cut file was created using George and also Paper Doll Dress Up, so if you would like this file I would be glad to send it out to you. Leave me a comment with your email address and I will send it out to you.

Find inspiration everywhere! Go... Create something fun & fabulous. Enjoy!

Tuesday, September 13, 2011

CTMH Art Philosophy Halloween pillow box

Isn't this awesome?! I love it. I used the CTMH Art Philosophy Cricut cartridge to cut the pillow box, the double belly band and the ribbon slide label shape that perfectly matches the stamp from the stamp of the month from August. The ribbon is from one of my recent Really Reasonable Ribbon monthly club selection.


I made it big using my Cricut Design Studio so that the label would fit across the top. The finished size is 3 x 6 inches and about 1 inch deep. That would fit a good bit of candy. This was quick and easy to make but I think it packs an adorable punch.

I would be happy to share this cute cut file. Just leave me a comment and be sure to leave your email address and I will send out the file to you.

Find inspiration everywhere! Go... Create something fun & fabulous. Enjoy!

Sunday, September 11, 2011

CTMH Art Philosophy card with cut out front


On the CTMH facebook page, during the month of September they are showcasing ideas using the Pair-a-Phrase promotion double stamp set. Today's idea really inspired me, so as soon as I got off work I came home and cut the card base and patterned paper liner with the CTMH Art Philosophy Cricut cartridge and stamped it up very similar to their example, using stamps from the promotion set. I love how it turned out.


I designed the card base and liner using my Cricut design studio software. The card is 4.25 x 8.5, so it is a perfect square after folding in half. The liner was cut a bit smaller and the shape out of the middle is smaller so that I will show as a border behind the card base.

Super simple once again, but if you would like to save a bit of time I would be happy to send you my little card and layer .cut file. You know the drill, leave your email address in a comment on this post. I will email the .cut file to you pronto. Than you can start cutting away.

Be sure to check the CTMH facebook page to keep getting more fabulous ideas on how to use the new Pair-a-phrase stamp set.

Find inspiration everywhere! Go... Create something fun & fabulous. Enjoy!

Friday, September 9, 2011

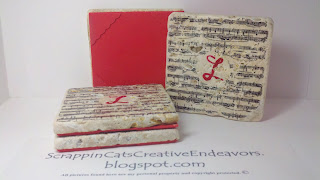
Tile coasters

I was inspired to create these tile coasters by this pinterest pin. I found the tiles at our local Home Depot, 10 natural tumbled stone tiles for right around $3.00. I used Stayzon Ink and CTMH alphabet stamps. Than I masked over the monogram with a circle punched from the sticky end of a post it note and stamped with a large background stamp. After the ink dried I sprayed....and sprayed....and sprayed with Krylon satin finish spray coating. I actually did 6 coats. Than I lined the bottom with Dollar tree fun foam using Gorilla glue, spreading it thin and even over the whole 4x4 piece of fun foam, with an old gift/credit type card.


Here are more. Done exactly the same way just using different colors of Stayzon ink and fun foam and very different background stamp. Super simple but pretty striking. I think they will make very nice gifts.

Find inspiration everywhere! Go... Create something fun & fabulous. Enjoy!

Thursday, September 8, 2011

CTMH Art Philosophy BOO decor


I was inspired to make this hanging decoration by this pin on pinterest. I used CTMH Art Philosophy Cricut cartridge for all but the bats and ghost. Those are cut Cricut Paper Doll Dress Up cartridge. I used CTMH Mischief paper and Goldrush cardstock, and inked all the edges with Black ink.


Here is close up of the B, with bat and the ribbon is from Really Reasonable Ribbon club. Lucky me, it matched perfectly.


Here is the O with the cutey patootey ghost.


And the final O and a different bat. The bats I accented with the new CTMH red glitz, on their eyes and fangs. I'm not sure if you can see it if you double click on the photo to make it larger or not. I cut all of the letters out of a cereal box also, with the Cricut set to repeat cut 4x's it worked perfectly. And made the letters stronger and more stable but still very light weight. I love to recycle into my crafts whenever possible.

This is a simple enough .cut file, but if you don't want to reinvent the wheel so to speak, I would be happy to send it out to you. Leave me a comment, be certain to include your email address, I have had a couple lately where it is not there and when I click on your profile I can't find it there either. Which means I feel bad because I can't mail the file to you as requested and you feel bad thinking I am a flake and don't follow through with my offer. I love to share my ideas and inspirations. I think that's what this internet is all about.


Find inspiration everywhere! Go... Create something fun & fabulous. Enjoy!

Monday, September 5, 2011

CTMH Art Philosophy Cricut reversible banner

I have been so inspired by all the banners and buntings all over the internet right now. They are everywhere, and they are adorable. I finally got to work and made one of my own. I used the new CTMH Art Philosophy Cricut cartridge to cut out everything. The scalloped base, the white and cream layers and all of the letters and shwoopies too.

I wish I remembered where I originally saw this idea for a double sided Halloween and Thanksgiving banner. I would love to give that person credit for their ingenuity and creativity. Suffice it to say, it was not my idea. But it is an awesome idea. Especially if you start with CTMH's new Mischief paper. Because one side is black and grey damask design and the other side is brown, orange and wine stripes. Decidedly Halloween and Thanksgiving feels. So that is my base paper, the scalloped banner layer.

Here is a close up of a little of the detail on the Spooky side. I used CTMH ink in Pear and Gypsy. The paper for all of the letters is CTMH Goldrush. The accent along the edge is from CTMH A timber stamp set. I used Glitz Grape stickles to add some bling and a few flowers from my stash in coordinating colors.  


Viola! This is the Thanksgiving inspired side. Just a quick flip and you have the decoration for the next holiday.

Here is a detailed shot of the embellishments to this side of the banner. I used CTMH Chocolate and Sunset inks. The detail along the edge is stamped with CTMH A flitter stamp and I blinged it up with the new CTMH Bronze Glitz. I also added a few random flowers from my stash.


And in the spirit of keeping it real! See what I did wrong? Oy! I am so lucky that each of the banner pieces was just tied together with ribbon. So it was easy enough to fix. But boy oh boy did my husband and youngest son have fun at my expense over this boo boo. They were doubled over with laughter when they noticed it (before I had....*slaps forehead in shame*). I had tied it together with the SPOOKY side up, and had inadvertently flipped the O's. But as you can see in the above photo, I had it fixed in under 10 minutes. So no harm done, and they say laughter is the best medicine. (Although I think the ones who said that, where not the ones being laughed at.)

Find inspiration everywhere! Go... Create something fun & fabulous. Enjoy!

Sunday, September 4, 2011

Pazzles silhouette cut cards


Friday was a wonderful Pazzles play day for my mom and I. I added an extra vacation day to the already long weekend, and so I called my mom around 7:30am and asked if she wanted to come over and play. She arrived by 9am with her Pazzles and laptop packed and breakfast treats to boot. Yahoo!

She had learned the technique of cutting out the silhouettes in card topper paper from a wonderful online video class through a Pazzles instructor, Klo. She was eager to teach me what she had learned. Shortly after arriving, snacking, setting up our Pazzles side by side she began designing the awesome card you see above.  As she designed her spooky Halloween tree card topper, I designed my spooky Halloween ghost and bat card topper you see below. The technique was awesome. Then she also reinforced the pen tools fantastic abilities.

So the Pazzles .wpc files we both designed have the pen tool dash lines and the shapes cut out in them. They turned out awesome. I love them both. On my ghost and bat card can you see the red mini gems I put for eyes? Spooky! I love it.


As is my nature, I went very crazy designing more and more cut out shape card toppers with built in dashed lines for the pen tool also. I love the pink and black of the hearts card. Too sweet.

This is a pretty 5 petal flower shape cut out topper. I made all three of the flowers different sizes. With this card topper I learned a lesson. I was using Sakura gelly roll pens in my pen tool in the Pazzles machine. Just on this one card in one spot the ink had not dried fast enough and the little grey plastic roller rolled over the wet ink and  smeared it. Thankfully not very bad. My way to hopefully camouflage the boo boo was to make it look like a loose thread left over from the faux stitching. Not fabulous but not a wasted effort either, so I am ok with it.


This is my fourth and final card designed using this technique. Again 5 petal flowers but this time all three are the same size. This is my least favorite, it was getting late and I was running out of inspiration when it came to decorating this card. But the .wpc file is cute and has lots of potential.

Thanks mom for another awesome girls play day. I had too much fun.

If you have a Pazzles and would like to have any or all 5 of these card topper .wpc files. We are happy to share. Leave me a comment here, with your email address, and I will send you the Pazzles files.

Find inspiration everywhere! Go... Create something fun & fabulous. Enjoy!
Related Posts Plugin for WordPress, Blogger...