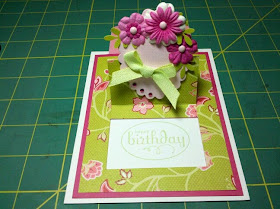
I was instantly inspired by this card tutorial from Split coast stampers newsletter this week. I love the videos that most of the ladies but especially Beate includes with their tutorials, it truly helps me understand the directions for these unique cards. Click here to see the video on youtube. This is a standard A2 sized card. 5.5 x 4.25, so as long as you don't go to fluffy with your embellishments it will fit in a regular invitation sized envelope.
This is the card flat. I used prima flowers with brads through their centers. I punched some leaves out of scrap card stock. The ribbon is from a long ago Reasonable ribbon club monthly selection and the hot pink nail heads I just ordered from Paper wishes catalog. I have this SU! Raspberry tart paper scraps all over my desk from recent projects so I grabbed it to quickly make this card. Plus I just love every single thing about it, bright beautiful colors, nice card stock weight, and I have several coordinating card stocks so right now it seems to be my go to paper of choice. I hope you are not getting bored with it.
TA DA!!! This is the card with the tab pulled up. The scalloped oval stands up to display my flowers and bow and surprise....there is a hidden message. LoVe It!!! So much fun.
Enjoy!
Wednesday, June 30, 2010
Monday, June 28, 2010
To cheer you card
As soon as I spotted the card at anotherdayanothercard.blogspot.com I was instantly wanting to make one for a friend who just had surgery, loves butterflies and would appreciate a handmade card to let her know I miss her. So I copied it as near as I could with the supplies that I had and using the purple that Janet, my friend who had the surgery, loves so much.
I used the new Creative memories butterfly punch. I punched out six butterflies from scraps of pink and purple papers and I ran them through my xyron. I use a stylus to trace the outside perimeter of anything I run through the xyron. It seems to cut down on the stringy, sticky mess that sometimes is left around the edge of your item. I turned the xyron encased butterflies over so the waxy side was up and traced with my stylus. Simple, but it really helps in my opinion. Then I removed the butterflies from the xyron sheets and I laid them in Martha Stewart super fine glitter. I bent them a bit so the body would be flat against the card and the wings have some curve away from the paper. A pretty little shimmery dimension. I stamped a shwoopy image around some of the edges and across the card for the butterflies to lay on, and I sponged the edges with the same CTMH blush ink with a dauber. The edge punch took off more of the front then I cared for so I layered on a strip of the pink that I had used for 1 butterfly and that extended the card front to match the back side. So my card is copied pretty closely but still pretty different. I really like it and I am inspired to try more....maybe a masculine take with stars....and how about using flowers across instead of butterflies. Very cute and versatile card design. Thank you Rosietoes.
Enjoy!
Sunday, June 27, 2010
Fun card making day with friends
My Saturday was full of fun and socializing, with wonderful card making too. A friend opened up her home to 5 of us to come over and make some cards. It was very fun and very productive. The first 2 cards I made were the secret message card style I had made a few weeks ago for my sons birthday card. These are very different, very girly and so fun.
The next one was thought up and designed by my SU! consultant friend, Brandy. I really love it, love how it turned out. She had a bit more detail that I forgot to do because I rushed ahead. But for the most part I copied it directly. We used the SU! top note die to make the front decoration.
This last one is inspired by a card designed by inkingidaho.com 06-12-10 post. Once again I rushed ahead a bit too much and missed out on the adorable detail of the spiral punched edge. Other than that its very similar and I think it turned out pretty cute. I used scraps from the baby stationary box gift set I made last week.
I love a good scrappy weekend with an additional treat of some girl time too. Enjoy!
Wednesday, June 23, 2010
Baby girl stationary box
I am loving this great gift project. This one is my second one completed, and I have to say I was much more efficient with my time. The first set I guestimate took me about 5-6 hours all total. This one took less than 4 hrs. This one is also much sturdier. I used a much thicker double sided patterned card stock as the basic box. Live and learn.
I got this great tulle at Beverly's today in the clearance bin. $1.oo for 2 yards of it. I lucked out that it is perfect for the pink in this project. I think it makes a cute girly topper for the lid of this project.
In case you missed the first stationary box I made you can see it here. I changed up the address book to a note pad style and I left off the stamps pocket altogether. I found the perfect fuchsia mini sharpie marker so that is what I included with this gift box. At splitcoaststampers.com under the tutorial for this stationary box there is a gallery, lots of people have uploaded their finished projects so I gleaned a lot of new ideas from those photos. I love the inspiration I can find at that fantastic website.
For this project I used Heidi Grace Designs double sided patterned card stock, and Coredinations pink and green card stocks, and coordinating patterned papers from my stash. Most of the ribbon used is from my monthly club kit from reasonableribbon.com, I am amassing quite the stash of ribbon. That's a good thing in my book!
I can't wait to give this to the expectant mama at her baby shower. I think it is a great gift for any occasion and so easily personalized to any occasion.
Enjoy!
Monday, June 21, 2010
Rag quilt tote bag
I made this tote bag for my dear friend, for her birthday. I got the inspiration from mychicnscratch.com, she has made a wonderful tutorial series on making these bags. The videos really are terrific. I used the SU! scallop square and cut the denim and also the cotton fabrics in my cuttlebug. The denim I can cut 2 layers at one pass, the cotton fabric I can cut 6 layers at one pass. Super-dee-duper fast and easy.
I recycled old jeans, cutting them up to use for this project. Even the straps and the button closure are recycled from cut up jeans. This tote takes 30 denim squares and 24 cotton squares, I used double layer denim on the bottom for extra strength.
Enjoy!
I recycled old jeans, cutting them up to use for this project. Even the straps and the button closure are recycled from cut up jeans. This tote takes 30 denim squares and 24 cotton squares, I used double layer denim on the bottom for extra strength.
Enjoy!
Thursday, June 17, 2010
More fathers day cards
Here are a few more guy cards. Using scraps from my desk top, so they are very similar to yesterdays cards. I think I might be getting the hang of these masculine cards now. The basic design inspiration came from thepaperlandscaper.blogspot.com from the 06-14-10 post. I did end up changing the focal point but the basic idea came from her card. I am loving the large alphabet stamps cut out. Its easy and I like the finished product. Enjoy!
Wednesday, June 16, 2010
Fathers day cards
Wow, this year is flying by. My boys are out of school, both of their birthdays have passed and now its almost Fathers day. Where does the time go these days. Thankfully these last minute cards were inspired by scrappinkaty.blogspot.com her post of 06-14-10. It was pure masculine card genius. I have such trouble with guy cards. But with these I still got to incorporate brads, ribbon, dry embossing, distressing and even some twine. All while maintaining a manly air. Yahoo! Thank you Scrappin Katy, you rock!
I used DCWV Rustic paper and misc. craft and cocoa card stocks. The stamps are CTMH Essential alphabet and Headline alphabet sets. All the brads and ribbon are CTMH also. I pulled out the CTMH edge distressing tool again also. Getting hooked on that detail. The diamond pattern at the top was made with my scorpal and after I embossed the lines I flipped the paper right side up and give it a gentle sanding to further bring out the detail. It's a little thing but I love the look.
I hope you are more prepared than I am, but if not I hope this helps to motivate you. Make a manly card for the men in your life. They deserve it.
Enjoy!
Sunday, June 13, 2010
Watercolored cards
I took this photo outside to try to capture the colors. I am really happy with this technique and how these cards turned out. I got my inspiration from juliesinkspot.blogspot.com again. I really like her blog and her varied style.
The sunflower/daisy stamp is a Fiskars petals from scratch stamp, I just picked it up at Joann during their 40% off everything scrapbook/stamping related sale. WOOT! I embossed it with SU! craft whisper white ink and white embossing powder. Then I water colored it with My SU! watercolor crayons and an aqua pen. Super easy. Add a lil bling and all done. The watercolor is the focal point.
Enjoy!
Saturday, June 12, 2010
Shabby chic card
I found a wonderful new website for new inspiration, its juliesinkspot.blogspot.com. This card from her 05-19-10 post called out to me instantly. I loved the look of it. So I copied it nearly completely. I used a soft blue ink to distress it with and a different sentiment. Other then that I am a copy cat-ter! Because it was perfection.
My picture sure doesn't show the details well, darn it. The flower is 3 different sizes of scallop punches, sprayed with Glimmer mist in Twilight, crushed and then re flattened and inked with Dew drop versa magic in Aegean blue. I layered a brad with a pretty silver brad buddy and a 1/2 pearl on top, this holds the whole flower together. The swirls are some sizzix dies and more 1/2 pearls at the ends of the shwoopies. Lots of distressed edges, I forget about that detail usually. But I like what it adds to the card. Enjoy!
Friday, June 11, 2010
Stationary box
This was a fabulous (and challenging) project. I have worked on it for 3 evenings. I received a newsletter from splitcoaststampers.com, and amongst the inspiration was a super tutorial. All the splitcoaststampers.com tutorials are full of step by step instructions, corresponding photos and usually a fabulously easy to understand video accompanying it. This one spoke to me right away "make me...make me.." it said. I had to oblige.
So above is the box all closed up. Ready to give to a sweet graduating neighbor girl, whom I sincerely hope will enjoy and use every trinket in this gift ensemble.
This is the inside, all loaded up with pretty goodies. When you remove the lid, the front flap lays forward to simulate a writing desk type set up. There are 3 pockets on the stand up back portion of the gift box. This is where you tuck: 6 A2 sized cards with 6 envelopes, 6 3x3 note cards and 6 gift tags.
This is a close up of the address book.
And a close up of the stamp pocket and pen holder.
These are the 6 A2 cards. I used the scrap pieces of patterned paper left after the gift box portion was completed. All of the sentiment stamps are SU!, their new acrylic mount line. I love them. I especially love the combination of cursive and plain text. Just beautiful
These are the 6 3x3 note cards. More scraps used to make these.
And finally the cute lil gift tags. I punched these with my Creative memories tag punch and layered on more scraps of patterned paper and some punched flowers. I even used the punched circles from the tags to add to the center of the punched flowers. Nothing goes to waste if I can help it.
So for this whole gift project I cut into 7 pieces of paper, 4 patterned papers from the SU! Bella rose paper pack and 3 sheets of coordinating textured cardstock. I think it is beautiful. I can't wait to give it to our neighbor.
Have a creative and fulfilling weekend. Enjoy!
So above is the box all closed up. Ready to give to a sweet graduating neighbor girl, whom I sincerely hope will enjoy and use every trinket in this gift ensemble.
This is the inside, all loaded up with pretty goodies. When you remove the lid, the front flap lays forward to simulate a writing desk type set up. There are 3 pockets on the stand up back portion of the gift box. This is where you tuck: 6 A2 sized cards with 6 envelopes, 6 3x3 note cards and 6 gift tags.
This is a close up of the address book.
And a close up of the stamp pocket and pen holder.
These are the 6 A2 cards. I used the scrap pieces of patterned paper left after the gift box portion was completed. All of the sentiment stamps are SU!, their new acrylic mount line. I love them. I especially love the combination of cursive and plain text. Just beautiful
These are the 6 3x3 note cards. More scraps used to make these.
And finally the cute lil gift tags. I punched these with my Creative memories tag punch and layered on more scraps of patterned paper and some punched flowers. I even used the punched circles from the tags to add to the center of the punched flowers. Nothing goes to waste if I can help it.
So for this whole gift project I cut into 7 pieces of paper, 4 patterned papers from the SU! Bella rose paper pack and 3 sheets of coordinating textured cardstock. I think it is beautiful. I can't wait to give it to our neighbor.
Have a creative and fulfilling weekend. Enjoy!
Thursday, June 10, 2010
Stationary box sneak peek
For the last 2 evenings I have been hard at work on this gift set. I am not quite finished so here is a sneak peek. I am using SU! Bella Rose paper pack, isn't it just gorgeous? I am having so much fun working with it.
I am too sleepy to be too chatty so I will say goodnight. I hope to post the rest tomorrow. Enjoy!
Tuesday, June 8, 2010
Secret message card
This is the card I made for my son for his 17th birthday. I really like it. Its very unique and fun. He loves puzzles so I knew he would think this was cool. I wasn't wrong, and he figured it out almost instantly, I didn't have to show him how to uncover the hidden message. Its a standard A2 sized card, 4.25 x 5.5 inches.
My inspiration came from a youtube video by Dawn5377, I found out she has a blog also. So you can find this and so much more by her if you search youtube for her or go to dawnsstampingthoughts.typepad.com her 05-28-2010 post.
This is the inside of the card, when you fold back the two halves that make up the front.
When you fold the center fold up towards you and touch the back sides together....
...it creates a visible split. You separate it on the new split and voila, the secret message. It's a beautiful thing! I used CTMH D1408 A little everything & D1400 Celebration stamp sets. They fit perfectly in the sections between the woven pieces, like they were made for this card.
I hope you are inspired to create one of these also, try it someone will really like it! Enjoy!
Sunday, June 6, 2010
Knitting is crafting too...
Its been a busy weekend. My boys finished school on Friday and my oldest is turning 17 tomorrow so we had a family celebration today. Big time BBQ with all the fixin's and thankfully he wanted cheesecake as his birthday cake. I don't bake cheesecake from scratch so we picked up a delicious New York style and a yummy and uber rich fudge brownie cheesecake. Oh my goodness, they were delicious. I have a birthday card to share but not until tomorrow, so today I will share my loom knitting project I just finished. Its a black shawl, sometimes called a prayer shawl. Really too warm to enjoy it this time of the year but it will be fabulous during the fall and winter.
This is a close up of the edge detail I crocheted on. Its kind of lacy and I like it.
I hope you had a fabulous weekend. I sure did. I hope you create something amazing this week. Enjoy!
This is a close up of the edge detail I crocheted on. Its kind of lacy and I like it.
I hope you had a fabulous weekend. I sure did. I hope you create something amazing this week. Enjoy!