Sunday, October 9, 2011

Cards & dates to remember organizer

I am a list maker. I have a terrible memory, so I make lists for everything. Something like this, where I make the list once and can reuse it over and over is AwEsOmE!!! The premise is to write the birthday, anniversary and other card worthy dates to remember next to the date and then slip the card into the envelope for the same month. Easy peasy! In advance, no rushing around at the last minute. I love it!

It all started on Pinterest. All the best projects do now. I saw and repinned this idea here, and my mind was racing and I was off and running. So this is my take on her great tutorial.

I love polka dots and I love God's rainbow of colors so that was an easy decision. I gathered up 12 envelopes and 13 coordinating papers. These are 6 x 9 so they will hold even 5 x 7 cards, although I rarely make that size, but good to have the options. Also a good size because one sheet of 12 x 12 paper will cover two sides of the envelopes and leave you some scraps for cover flaps and maybe even decorating the front.   :)

I cut the polka dot papers just .25 inch smaller then the envelope so I would have a border and also not have to worry about edges coming up with use and time. I hand cut the envelope flap liners. I printed my dates list and the months on the computer using a font I liked. Trimmed them up and taped them all down to the envelopes.


This is just to show you I lined the inside of the envelope too. I did not want to risk humidity making the glue stick to the gorgeous polka dots and having to tear it away. I really do hope to use this for a long time. Such a great organizational idea. I might make a second to keep at work, just so I don't forget friends and coworkers and be forced to use a store bought card *gasp*.

Find inspiration everywhere! Go... Create something fun & fabulous. Enjoy!

Tuesday, October 4, 2011

CTMH Art Philosophy fall leaves card


This is another wonderful project created form the CTMH Cricut collaboration cartridge, Art Philosophy. I love, LOVE, LOVE this cartridge and the coordinating stamps make it even more wonderful. I CASE'd this card from the youtube video I pinned in Pinterest here on my card ideas board. I love Pinterest and being able to save links directly to youtube videos now just makes it that much better.

I did not have burlap on hand, so I improvised with CTMH sahara sand card stock. I trimmed it to 3.5 x 4.5 and then I decided to use my pinking scissors around the edges. I ran this piece throught the Cuttlebug with the SU! embossing folder and then took a sanding block gently to the top and edges to bring out more of the embossed details.

The leaves are cut out of white card stock on the Cricut using the Art Philosphy cartridge at the specified 2 inches on the stamp set. When the cutting was complete I stamped one leaf in CTMH Sunset ink and one leaf in CTMH Tulip ink. The third leaf is stamped in CTMH Olive ink using the word overlay stamp from the CTMH So grateful stamp set. I crumpled each leaf just like the video and then used a sponge and some CTMH sahara sand ink to distress each leaf a bit.


Find inspiration everywhere! Go... Create something fun & fabulous. Enjoy!

Sunday, October 2, 2011

Halloween tulle wreath


These gorgeous tulle wreaths are all over the internet and crafting blogs right now. I love them. I was inspired by so many wreaths I had begun pinning them on Pinterest, you can see them here in my holidays board.

I bought a 10 inch embroidery hoop and a roll of 6 inch tulle from JoAnn's for less then $5.00. I separated the hoop and so far have only used the inner hoop without the screw tightening mechanism. But I still think I will use this outer hoop for a fall colored wreath next. I can cover up the screw mechanism with a bow or something.

I took the roll of tulle and using my self healing mat and my rotary cutter, I cut 68 ten inch pieces. I tied all 68 pieces around the hoop, pulling them tight and bunching them close. I did not actually tie knots, I folded the 10 inch strip in half and then pulled the ends around the hoop and through the loop created by the fold, making sure to keep them all going in the same direction. When I was all done and fluffed the tulle I decided the direction thing probably didn't matter at all.  


As pretty as she was I decided she needed a little more oomph. So I used what I had in my stash, which was a 3 inch roll of orange tulle and 6 inch roll of glittered white tulle. I cut 5 more 10 inch pieces out of each color and randomly attached them between the black tulle. I created the hanger and bow from 3/4 inch orange grosgrain, which I feel is small and insignificant. So when I am able I will go shoppinf and get some 1.5 or maybe 2 inch orange ribbon and remake that part, so it will be more substantial.

I do not exaggerate when I say the whole thing took me 1 hour, while I was watching a recorded TV show. I think this would make a great gift for most holidays and at under $5.00 and around 1 hours time, that's a beautiful thing.

Find inspiration everywhere! Go... Create something fun & fabulous. Enjoy!

Wednesday, September 28, 2011

Altered frames to dry erase boards

More Disney inspired goodies for my craft room. I found these 3 super light weight 8.5 x 11 inch picture frames at Ikea. I decided they would be perfect for the dry erase boards that I have seen all over the internet, made from picture frames, some pretty scrapbook papers and maybe some embellishments. Since they were so light weight I knew they would be perfect for my favorite 3M tape tabs to hang them with.


Here is a close up of my darling scrapbook paper I chose. All three patterns are polka dots. And my embellishments are silk flowers from Dollartree all layered up and held together with brads. All in Disney colors of course.


See how easily the writing swipes away? Even from my frames, because as I discovered they are not glass but plastic. I removed the protective layer and tested on a corner, just to be sure the pens would work the same as if they were glass. For the most part they do. I did find that the large Expo brand pen scratches the plastic, leave a bit of a ghost image behind after you wipe with a paper towel or cloth. The Vis-A-Vis brand and a cheap brand that had a built in magnet and little felt erase in the lid (but no name on the pen anywhere) where soft enough tipped that they did not scratch the plastic or leave any trace behind.


A close up....its hard to see the minute scratches and the color completely wipes away. Pretty darned fun and inexpensive. I like the idea of the plastic instead of glass for maybe making magnetic ones for the fridge. Just in case it fell, it would not break.

Find inspiration everywhere! Go... Create something fun & fabulous. Enjoy!

Friday, September 23, 2011

Magnet board


This is a magnet board, it started out as a metal place mat from Ikea. With some pretty Disney inspired papers and ribbons and buttons and brads it has been transformed into this useful cuteness that is now hanging in my craft room. I love it!

The place mat is 14 x 14 inches so that is why I had to patch the pieces together. Then at each of the edges of paper I decided to tape down the gingham ribbon. I used my atg gun and a glue stick for adhering the papers to the metal and I used Scor-tape to add the ribbon.

I used my Crop-a-dile to punch the holes for the ribbon to hang it from. Worked like a charm. Just FYI even though you can see it (I cropped the picture a little too tight) I hung this on the front of one of my cabinet doors using a 3M Command adhesive hook. I love that stuff. It holds like crazy and doesn't damage the finish when you are ready to remove it.


Here is a close up of the little ruffly, girly detail. I layered scallop edged papers and I bunched and ruffled the ribbon too. I added the little alpha beads on some skinny red wire and then hung the wire through the gingham ribbon.

The corduroy buttons and brad tops are from SU! some clearance goodies I picked up a while ago. I glued them to magnet disks using E-6000 glue. And that's all. I think I actually worked on this for about 4 hours, but a lot of that was laying things out and moving around before I got down to the actual adhering. I think these will make great gifts that can be personalized by favorite colors or patterns.

Find inspiration everywhere! Go... Create something fun & fabulous. Enjoy!

Sunday, September 18, 2011

CTMH Mistletoe Christmas card

Here are more unique sized Christmas cards made for the card class I am helping to design for. These cards are 3.25 x 6 inches and fit inside the standard security envelopes. I get a box of 100 envelopes at the Dollartree store. The inspiration for the card comes from ideas I pinned on Pinterest here and here. I barely changed anything from the second design, except keeping the unique shape from the original card.

These are made using CTMH Mistletoe papers, they are double sided patterned paper so both cards are cut from the same sheets and just flipped over. I used CTMH Card Commentary stamp set stamped in Cranberry and New England Ivy inks, Cranberry grosgrain ribbon and Red Glitz to finish off the card.


Here you can see a closer view and also the lined envelope.


Here is the second option, all the same papers just flipped over for a different combination. Luckily with this pair of cards I can not pick a favorite. I think they both turned out great. I hope the class attendees feel the same.

Find inspiration everywhere! Go... Create something fun & fabulous. Enjoy!

Saturday, September 17, 2011

CTMH Art Philosophy Christmas card

I know, I know its too early for Christmas cards. I am designing 2 cards for a Christmas card making open house, so I have to start early. I was inspired by the card I pinned on pinterest, here. This is my first card design, I just showed the option of flipping the double sided paper over.

This is the second option, not my favorite. I don't think the H's pop enough with this paper combination. In this photo you can also see the lined envelope. I lined the inexpensive security envelope because it has a very distinctive blue pattern, not pretty! The size of these cards is 3.5 by 6 inches.


This is my favorite combination. Both of these are made using CTMH Believe paper pack and holiday red and sweet leaf card stocks. I cut the pretty shaped pieces and the H's using the CTMH Art Philosophy Cricut cartridge.


I include these last 2 shots just to show you other snowflake cuts and punches I tried out before settling on the large Martha Stewart punched snowflakes. I really wanted to cut snowflakes from the CTMH Cricut cartridge, there are 3 different ones that are really pretty, but cutting these small enough to not over power the card was not coming out consistently good enough to use.
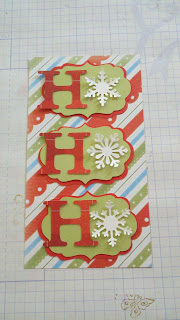

I liked the idea of 3 different snowflake shapes, these are all from Martha Stewart punches, but these are too small and get lost on the card. So I had to forsake variety for more visual punch. But I am really happy with the final card. I embossed the green shape layer with an embossing folder that leaves a random all over dot pattern. I hoped it was kind of reminiscent of snowflakes.

Find inspiration everywhere! Go... Create something fun & fabulous. Enjoy!
Related Posts Plugin for WordPress, Blogger...