Showing posts with label sneak peek. Show all posts

Sunday, March 20, 2011

You are my sunshine card & a sneak peek

Talk about spring dreaming! This card is screaming out for spring....now. Isn't it pretty? All those pretty bright yellow prints. I love it. I watched a youtube video by K.Werner today and had to copy it instantly. It was fun to make, and I used up 8 different scraps, between the rays and the butterflies and the matting. So check out her fabulous video here, and then make a spring card of your own.

This is a detail shot to show you the patterns and the glimmer mist. I used lemon zest on the butterflies and pearl on the card base.  The sentiment is from CTMH D1375 Treasures stamp set, and I used Sunny yellow and rolled the edges in Sunflower. The butterflies are from a SU! embosslit.

And here's a sneak peek at a Pazzles card I made, I will share it after we give it to the recipient. Don't want to risk ruining the surprise, but I didn't want you to think I barely touched paper this weekend. This Pazzles card turned out better then I had hoped, thanks to my mom for designing a "Super" logo for me. Thanks Mom!

Find inspiration everywhere! Go... Create something fun & fabulous. Enjoy!
 

Saturday, March 5, 2011

A sneak peek and a many layered card

This is a little peek at what has been keeping me busy this week. I am working on a baby girl brag book and it is not coming together easily. Its for my hubby's niece, her first baby, and I think I am putting a lot of pressure on myself.

I got a bag full of SU! goodness delivered to me yesterday, so I had lots of temptation laying around on my desk. I decided to take a lil break and play with those. This is what I came up with.

What started out as a simple card idea turned into a layer-licious card. With pop dots, ribbon and buttons...oh my. It still came together fairly quick. The color scheme was determined by some ribbon from one of my monthly kits that I had not broke out yet.


Find inspiration everywhere! Go... Create something fun & fabulous. Enjoy!

Monday, December 13, 2010

Sneak peek at my exchange ornaments


I have been working diligently in my craft room, but what I am making is for a ornament gift exchange between all my favorite crafty friends at work. Some of them (hi Brandy ;)) see my every post. So I have not forgotten my blog readers, I just have to keep my current projects a secret for just a tad longer. Thankfully I finished all 5 of my ornaments tonight, so now I will move on to some cute wrapping ideas I hope. Since I haven't wrapped a single Christmas present yet.

Thanks for stopping by, I will post all the photos for this project next week.

Find inspiration everywhere! Go... Create something fun & fabulous. Enjoy!

Saturday, November 6, 2010

Scrapbook Expo

I had a ton of fun at the Scrapbook Expo in Sacramento on Friday. My mom and friend Ang have been counting down to this day for months. We were there in line by 9:30am, and once inside the showroom at 10am we went right to the fabulous Tattered Angels booth and did their free make and take. After that it was near 6 hours of browsing. 
We stopped for a yummy lunch and caught a "breeze" of a second wind. But our feet soar and our bags heavy, we headed out about 3:30pm-ish. Above is all my loot (and a few gifts) spread out on my bed. What fun we had.  

Find inspiration everywhere! Go... Create something fun & fabulous. Enjoy!

Sunday, July 25, 2010

My craft cave close up

So, lets get up close and personal. ;) With a few of my favorite things about my craft room, that is.

This is an assortment of plastic bottles mounted to the underside of my cabinets. They hold all my buttons sorted by color. When I want 1 I just unscrew it from the lid and take it down. It is held in place by Scotch brand double sided foam tape, the kind that you pull the tab and it stretches and comes off without leaving a mark. 1 of my favorite inventions ever!

This is 1 of 3 fabric covered cork boards that hang in my craft room, between the counter top and the upper cabinets. They have the criss crossing ribbon, tacked down with a button, held on with stitches that tie at the back of the board.

This is my baby bug, its all blinged out with rub ons. I am really happy with how this turned out. I blinged out my ATG gun with the same rub ons. Shwoopies and red and black. All my favorite things.

2 more fabric covered cork boards. These are covered with hand made cards that have been given to me. Aren't they all so beautiful?

This is all my stickles hanging under my ribbon shelf. They hang by velcro circles. You also see some of my ribbons, they are sorted by colors and kept in Sterilite boxes. I get them at the Dollar tree or Walmart. My loose ribbons I wrap around old fashioned clothes pins and secure with a sewing pin.

These are my EK success cutterbee's. Since I use them most often with my Scor-pal I have them hanging on more Scotch brand removable hangers, right at my desk side.

This is a close up of my wire file holder that holds my self healing cutting mats, Scor-pal, Fiskars paper trimmer, rulers and my piercing mat and tool.

This is it emptied of most of the contents so you see closer what I mean by wire file holder. Office supply store basics, nothing special. I blinged it up with some ribbons and buttons and brads. I have to have my Disney touches.

These are the pringles cans covered in card stock. Notice the different images stamped on the strips of paper? Those are the SU! rollers that are held inside that particular pringles can. So its pretty and functional.

This is the contents spilled out of the smallest of all the pringles cans. They fit perfectly. I wish I remembered which blog I got this idea off of, but it was a long time ago and that information is lost to me now....but rest assured, I did not come up with the concept I just changed it up to match my decor.
I hope I didn't bore you with the long post.
Be inspired! Go... Create something fun & fabulous. Enjoy!

Saturday, July 24, 2010

My craft cave

This is my fantastic craft room. It used to be humbly called the "crap" room. Since we don't have a garage it was used for storing stuff. Christmas decorations, old baby clothes, seldom used household tools....stuff. Inspired by Clean sweep TV show, I did a clean sweep and stripped the room back to the bare walls. Sorted, tossed, donated and very little came back into our home. Whew! After that my guys got involved and helped me pull up carpet, remove baseboard, knock out the closet framing. Then we started with the fun stuff. We put in hardwood flooring, baseboard to match the rest of the house and put in cabinets and counter tops. It is such a wonderful useful work space. The room itself is tiny, only 11 x 13 and it also holds the 2nd door in our house that leads out to the back yard. So everyone passes through here several times a day. I think I have maximized every inch of space. So take a 360 degree spin around my craft cave with me.

This is the beautiful stitched picture my mom made for my room. It hangs on the door as you enter the room.

This is to the right of the door. 2 sets of shelves over the work desk hold my extensive ribbon collection, silk flowers and twines and flosses. Underneath the shelves I have attached my stickles with velcro dots. The little decorative shelf holds Disney tins that corral my most often reached for tools, i.e. scissors, tweezers, embossing tool, xacto knife.

This is my work space. I sit on the ergo ball chair and have all my favorite things close at hand. Against the wall I use a wire file organizer to hold my cutting mats, my Fiskars cutter and my rulers. My cup holder actually keeps my ribbon iron, heat gun and glue gun close at hand. My ott light is close too. A wire paper tray holds my creative memories cutting shapes. My ATG gun is always at my fingertips. My laptop sits ready and waiting to offer creative inspiration on top of an old dictionary I cut up for book print papers when needed.

The book cases behind my desk hold my ridiculous paper stash, idea books and on the top I keep my prima flowers, glimmer mists and my SU! rollers are in the Pringles tubes that are covered in red, white, yellow and black (in keeping with the overall Disney theme to my room.)The wall shelf hanging between the two gorgeous Christian Reese Lassen posters was made by my hubby. I use it to hold seldom used acrylic paints and old fabric paints but mostly all my favorite finished projects hang out in there. On the top shelf and the top of the cabinet are more Disney memorabilia, stuffed animals, pez dispensers and more.

Here is the first set of cabinets. On the counter top is my printer, my baby bug and boxes and boxes of cards ready to give away. I know its hard to see but on the wall between the upper and lower cabinet is 2 fabric covered cork boards. I use them to display all of the handmade cards given to me. They are beautiful inspiration. On top of the cabinet are large recyclable items I am hanging onto for altering projects.

The lower cabinets are a wreck, but the uppers are fantastically organized and easy to find everything so I will share those with you. The left cabinet holds my CTMH acrylic stamp sets. The right cabinet is my bling cabinet. Tons of brads, eyelets, pearls and gems. Also sets of chipboard pieces and acrylic shapes. I also have my Cricut cartridges and books in the lower right corner.

This is the upper and lower cabinets that fill the old closet space. The counter top holds my Bind-it-all, Cuttlebug and CTMH ink and pen tower. The wall space has another fabric covered cork board, this one holds photos and Disney memorabilia. Under the upper cabinet I have attached, with Scotch double sided foam tape, plastic jars full of buttons sorted by color.

This shows the button jars a bit better. This cabinet hold my blank cards and envelopes stash, plus my holiday acrylic stamp sets.

This cabinet holds tons and tons of fabulousness. Nestabilities, Crop-a-dials, Xyrons, embossing folders, Sizzix dies plus more.

This is a canvas that I painted and altered with CTMH rub ons just for my Disney theme room. That's a picture of my sons first visit to my favorite vacation place on Earth. Circa 2000. That picture makes me smile every time I look at it.

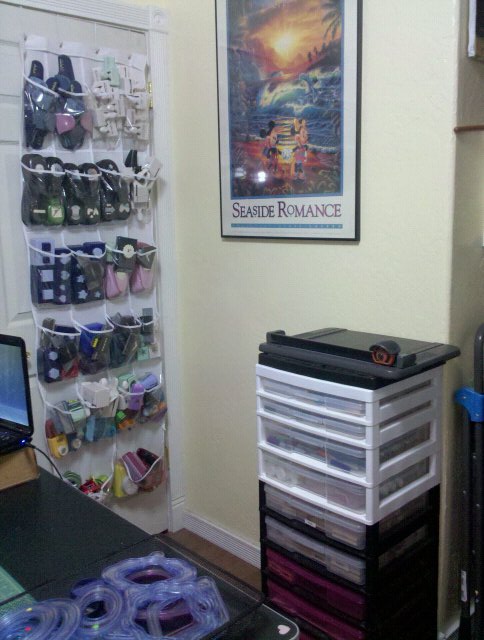
We are back to the door, this is the backside, I have a shoe holder hanging on the backside. It holds all my punches. The plastic stacking trays hold my large paper cutter, pens (Copic and others), some often used wood mount stamps, and paper scraps sorted by color. I access these a lot. I removed the casters so that the unit is stationary and more stable.

This is underneath my huge work desk. The recycled coffee table holds more books for scavenging and all of my wood mount stamps. The little rolling cart holds more lace and trims and twines. Also small alterables, paper pads, sticky note pads, paper clips, binder clips. These I don't access as often.
Whew! Sorry for the crazy long post. I hope you see some inspiring storage or organize or decorating ideas. Thanks for stopping by.
Be inspired! Go... Create something fun & fabulous. Enjoy!

Thursday, June 10, 2010

Stationary box sneak peek

For the last 2 evenings I have been hard at work on this gift set. I am not quite finished so here is a sneak peek. I am using SU! Bella Rose paper pack, isn't it just gorgeous? I am having so much fun working with it.


I am too sleepy to be too chatty so I will say goodnight. I hope to post the rest tomorrow. Enjoy!
Saturday, May 8, 2010

Mothers day sneak peek

I have been busy busy busy crafting away.....but I can't share any photos yet. My mom is my #1 fan here (and everywhere else in my life.) XOXO Love you mom! So I took some close up photos of a few details on one of the gifts. Just a teaser.

This photo doesn't really do this flower combination justice. It shimmers from pearl glimmermist. It's really pretty.

This is a new CTMH Petite perks, Dreams stamp set. I used it for small decorations that I sprinkled throughout the gift. I can't wait for you to see the whole project and the other coordinating presents. Check back tomorrow, I will post the rest of the photos. Have a happy and blessed mothers day. Enjoy!
Related Posts Plugin for WordPress, Blogger...