Sunday, August 28, 2011

My first CTMH Art Philosophy Cricut projects


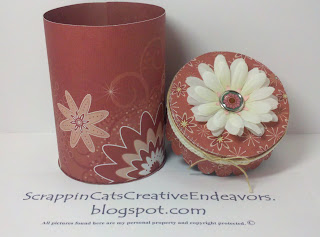
I got my new CTMH Art Philosophy Cricut cartridge on Saturday. And wow, am I impressed! I went through the handbook several times just soaking in all of the gorgeous shapes and cards and 3d items available. Then I just had to cut some paper using it. So I chose this little gift bag and opened up my Design studio and got to work. All of the shapes decorating the fronts (and backs, even though you can't see them) are available on the cartridge.

These decorative pieces are cut from the Hooligan CTMH papers.

This is also from the Hooligan paper line. I cut the shapes and the frames out of the same papers and just flipped them over to show their contrasts.


This decorative paper is from the CTMH Mischief paper line. I cut a frame and then I also cut a coordinating circle in the gift bag and lined it with recovered/recycled acetate from the Cricut cartridge packaging. Love that!!!

I can't wait to play some more, especially with the 3d items....oh, and the cuts that coordinate with all the wonderful CTMH stamps.....and also the card shapes and the envelopes and the adorable alphabet. Oh, the possibilities are endless. *big smiles*

I saved this project .cut file in my Design studio and will be happy to share with everyone. Leave me a comment here and be sure to include your email address and I will send it out to you.

Find inspiration everywhere! Go... Create something fun & fabulous. Enjoy!

Tuesday, August 23, 2011

Paint chip note pads


I love these little note pads. I am a color junky, so when I first saw this project and pinned it here, they really called to me to make them. I spent some time at the Home Depot paint area and Walmart also. The outside are mostly Behr paint chips and the inside liner is Glidden paint chips. They worked out perfect for binding plain 3 x 5 index cards.


Here is an interior shot. I used my bind-it-all to turn these into cute note pads. Used some black, white and a silver 1/2 inch O rings. I totally can't wait to make some more paint chip projects. Love these.

Find inspiration everywhere! Go... Create something fun & fabulous. Enjoy!

Saturday, August 20, 2011

Another SU! card buffet party


Friday evening I went to my friend Tina's house for another wonderful card buffet. You can see all of Tina's beautiful works at her blog, thecrazystamplady.blogspot.com. Her card buffets are awesome, she has a selection of 12 cards this month and we can choose 8 in any combination we like. As you can see a few of them I liked so much I made 2 of the same design.


She preps so much of the stuff that we can literally make 8 cards in 3 hours and snack and visit too. We do our own stamping, punching and assembly.

Oh yes and our own sponging and glittering. Such a selection of beautiful cards to make.

Love this striking color combination. Tres chic. No?

This was my favorite. So sweet and pretty. Love the bunchy, scrunchy flower.

And this is the final darling. It was a wonderful and fun evening as always. Full of good friends and laughter and creativity and beauty. You can't beat that.


Find inspiration everywhere! Go... Create something fun & fabulous. Enjoy!

Wednesday, August 17, 2011

Mischief treat baskets for Halloween and Thanksgiving

I'm at it again. Making treat baskets out of garbage. *big smile* I love these, they are so cute and easy to create. I originally debuted this cute recycle/upcycle creation here, and have created a few more since then. These are created with CTMH Mischief paper, and stamps and paper flowers that were dyed with CTMH ink pads and also some CTMH sparkles. I cut 3/4 inch strips and randomly pinched a pleat down the whole length and then hot glued it to the rim of the yogurt container. The body is wrapped in 3 x 9 inch strip of the same patterned paper. Then I embellished each one a bit different, for the upcoming holidays.


Here is a overhead view. You can see the pleated paper strip decoration, and also the handle decorated with different ribbons from my stash. Now I can fill them with chocolatey surprises and give away. What fun!


Find inspiration everywhere! Go... Create something fun & fabulous. Enjoy!


Wednesday, August 10, 2011

Monogram card gift set

I made this card set as a gift for my dear friend, Lorie. Her favorite color is green and she has a classic, elegant taste so I hope she loves this simple feminine note card gift set. I used a SU! embossing folder to decorate the card front and the envelope flap. I added a little gold glitz stickles to some of the design.


Here are the six gift cards and envelopes packaged in a clear envelope tied with some sheer green ribbon.

Find inspiration everywhere! Go... Create something fun & fabulous. Enjoy!

Saturday, August 6, 2011

Cupcake stand and candy bowl


I am so excited, I finally took the plunge and made some of these altered candle sticks and plates. I have been collecting inspiration here, for a while. I went cheap for my first attempts and got everything pictured at the thrift store. So this whole ensemble cost me less than $5.00. Woo Hoo! The plate is a sandwich sized plate and the bowl is about 6.5 inches across and 3 inches deep.


I couldn't find recommended E-6000 glue at Walmart so I read the information on this Loctite brand, and decided to give it a try. It worked out fine. I layed out an old ratty towel and had my cotton swabs and acetate handy for any quick clean up needed.


I used two heavy books to weigh them down during the 24 hour curing time. They turned out awesome, now I am ready to branch out and make some more. Maybe some with holiday themes or just a few more with the clear blue glass for setting a pretty table.


Find inspiration everywhere! Go... Create something fun & fabulous. Enjoy!

Thursday, August 4, 2011

Pazzles round gift box

This past Saturday my mom and I had another Pazzles play date. We got a little sidetracked by a trip to Ikea, ok 3.5 hours sidetracked....but it was worth it. After that we got down to some Pazzles play time. She had downloaded this darling round gift box .wpc file from Paula who goes by massofhair on the Pazzles craft room and yahoo groups. She designed this file and offered it and my mom had downloaded it. This was her/our first time cutting it. What an awesome design. Thanks, Paula!


Can you believe I cut this gift box from scraps from my last Pazzles play day. It turned out great thank goodness, but if it had needed tweeking or I had messed up the assembly I thought I wouldn't feel so bad about using scraps to test it. But all went wonderfully, so my test cut is this little beauty. I used Cloud9  design Cinnamon Stick papers. They are really unique and beautiful. I embellished the lid with some CTMH crocheted trim and some very old twine that I inherited from my mother in law. The flower on top is some deconstructed silk flowers from Dollar tree and a brad for a little bling in the center. I'm really happy with how it turned out. I hope to make some more of these for little holiday gifts, either Thanksgiving or Christmas. Just changing up the papers used and the embellishments a little, will make it perfect for either holiday.

Find inspiration everywhere! Go... Create something fun & fabulous. Enjoy!
Related Posts Plugin for WordPress, Blogger...