Wednesday, August 10, 2011

Monogram card gift set

I made this card set as a gift for my dear friend, Lorie. Her favorite color is green and she has a classic, elegant taste so I hope she loves this simple feminine note card gift set. I used a SU! embossing folder to decorate the card front and the envelope flap. I added a little gold glitz stickles to some of the design.


Here are the six gift cards and envelopes packaged in a clear envelope tied with some sheer green ribbon.

Find inspiration everywhere! Go... Create something fun & fabulous. Enjoy!

Saturday, August 6, 2011

Cupcake stand and candy bowl


I am so excited, I finally took the plunge and made some of these altered candle sticks and plates. I have been collecting inspiration here, for a while. I went cheap for my first attempts and got everything pictured at the thrift store. So this whole ensemble cost me less than $5.00. Woo Hoo! The plate is a sandwich sized plate and the bowl is about 6.5 inches across and 3 inches deep.


I couldn't find recommended E-6000 glue at Walmart so I read the information on this Loctite brand, and decided to give it a try. It worked out fine. I layed out an old ratty towel and had my cotton swabs and acetate handy for any quick clean up needed.


I used two heavy books to weigh them down during the 24 hour curing time. They turned out awesome, now I am ready to branch out and make some more. Maybe some with holiday themes or just a few more with the clear blue glass for setting a pretty table.


Find inspiration everywhere! Go... Create something fun & fabulous. Enjoy!

Thursday, August 4, 2011

Pazzles round gift box

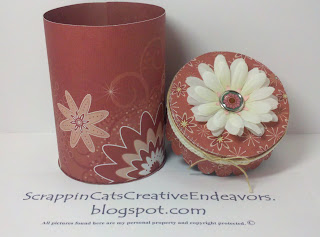
This past Saturday my mom and I had another Pazzles play date. We got a little sidetracked by a trip to Ikea, ok 3.5 hours sidetracked....but it was worth it. After that we got down to some Pazzles play time. She had downloaded this darling round gift box .wpc file from Paula who goes by massofhair on the Pazzles craft room and yahoo groups. She designed this file and offered it and my mom had downloaded it. This was her/our first time cutting it. What an awesome design. Thanks, Paula!


Can you believe I cut this gift box from scraps from my last Pazzles play day. It turned out great thank goodness, but if it had needed tweeking or I had messed up the assembly I thought I wouldn't feel so bad about using scraps to test it. But all went wonderfully, so my test cut is this little beauty. I used Cloud9  design Cinnamon Stick papers. They are really unique and beautiful. I embellished the lid with some CTMH crocheted trim and some very old twine that I inherited from my mother in law. The flower on top is some deconstructed silk flowers from Dollar tree and a brad for a little bling in the center. I'm really happy with how it turned out. I hope to make some more of these for little holiday gifts, either Thanksgiving or Christmas. Just changing up the papers used and the embellishments a little, will make it perfect for either holiday.

Find inspiration everywhere! Go... Create something fun & fabulous. Enjoy!

Saturday, July 30, 2011

Roxie cards


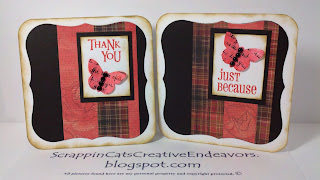
Woo Hoo! I feel like I am really getting the hang of this only CTMH products restriction, for making class cards. It is easy with so many new and beautiful products in the new idea book. This card is a 4.25 x 4.25 square and was inspired by a card in the Autumn/Winter 2011 idea book, page 19 again. Along the lower edge you see one similar, I did quite a bit of creative tweaking to this one. I believe their card base was cut with the Cricut cartridge, since I still don't have it, yet....I just rounded the corners on a basic card base then used some Nestabilities to cut the shape out of the 3 different papers you see there. The papers are from the new Roxie set. The white card stock edges were sponged with Desert sand ink and a sponge dauber, just to soften them up a bit. It seemed a bit harsh next to the Roxie papers.    


The sentiments are from Say it in style stamp set and stamped in Smoothie ink pad. The butterflies ~oh the butterflies~ I love these new flutter paper shapes. They have a beautiful texture of a mulberry paper and a black script detail on them. They are white when you purchase them, but I colored this one with Smoothie ink to match my project. I squeezed the ink pad so the lid touched the pad just a bit, so when I open it there is a smear of ink on the inside lid. I then used our spray pen and spritzed a little water onto the ink on the lid. Then I set the paper butterfly down in the diluted ink and it sucked it right up. Laying it to the side to dry, I grabbed a sheet of sparkles and a sheet of pearls and a plain old black sharpie permanent marker and colored 4 of the sparkles and 4 of the pearls. I added the dried butterfly to the card with a thin strip of tape so the wings are free and curl up prettily and then I added the slightly altered CTMH bling to the center of the butterfly. Easy peasy, but so pretty I think.


I have to show you my new stamp for the back of my handmade cards. Its a cat from a Halloween dollar priced set I got this weekend at our LSS Green Tangerine. I had a super fun girls night out with my mom and one of our stops was to this wonderful store. I scored this stamp and a few other goodies. The alphas I have had for a while, I know they are Studio G from Michaels. C.A.T. is my initials and my self imposed pseudonym. So I thought this was just perfect.


Find inspiration everywhere! Go... Create something fun & fabulous. Enjoy!

Friday, July 29, 2011

Wonderland cards


I must admit these are by far my favorite all CTMH product class cards I have made yet. I took my inspiration from the new Autumn/Winter 2011 idea book, page 19. The tiny card idea in the lower right hand corner. Super cute details. Now their design used the new Cricut cartridge I am sure, but I don't have it yet. (Mom, don't read this next part.) I. Want. It. At first I was skeptical but seeing only some of the 700 cutting shapes that coordinate perfectly with so many of our stamp sets. Yep, I totally want it! Sorry mom, I still love my Pazzles but Cricut is still easier for me.

Ok, about these cards. They are 4.25 x 4.25 squares that I took a 1 inch circle punch to the corners and removed about .25 of the circle to create the kind of ticket edge I wanted. The paper is Wonderland and you are seeing both the front and back designs there.  


This is a detail shot. I love it!!! I used the wonderful new tear off strip as the little strip detail behind the squares. See it? It's blue with a brown half circle doily type image. It's wonderful, functional not wasteful. I think that is just one in a LONG list of new things they implemented in this new catalog. YAHOO, CTMH!! Love it. The sentiment is from the Say it in style set and was stamped in Twilight and Chocolate inks. The stamp was one long sentiment, I used my super sharp Fiskars scissors and nipped it in two. Makes the two toned stamp detail super easy. You also see wooden buttons there, I used a sliver of Chocolate card stock as a faux stitching detail and adhered the whole thing down with a glue dot. Love it, finally a masculine card that I really enjoyed making. Fun stuff.

Find inspiration everywhere! Go... Create something fun & fabulous. Enjoy!

Wednesday, July 27, 2011

Mayberry cards


These are my 2nd attempt at class cards using only (mostly) CTMH products. This was made using the Mayberry paper pack, the patterned piece is 1 sheet showing both front and back. I love double sided patterned paper. Really, I do! I used the A sip stamp set in Smoothie, Olive and Cocoa ink pads. On the card on the left I ran the edges over the Cocoa ink pad, and on the right I used a sponge dauber in the Cocoa again and sponged the edges. The left is subtle, the right is more aged and vintage-y. I also used a piercing tool and a piece of plastic mesh used for some sort of yarn craft (drat, I forgot the name) but anyways, I used it as a spacing guide for my piercing detail on the corners. I have a 2 x 12 inch piece I received from my CTMH upline and then I found round pieces intended for making coasters, but again I just use them as round guides for piercing. Pretty cool inexpensive detail tool.


Find inspiration everywhere! Go... Create something fun & fabulous. Enjoy!

Tuesday, July 26, 2011

Sweetheart card


I am working on cards for a CTMH class for some friends. It's hard for me, I mostly use my CTMH consultant benefits as a hobby supplement. So designing for a "class" and using "ONLY" CTMH products is challenging. I love them but I usually create freely with all my pretty things.

This card is my first attempt. Using the sweetheart papers, this is one sheet front and back. SSSOOO cute. Black and pinks are my very favorite color combination. I used Love Ya! stamp set and did the rock -n- roll technique using Baby pink and Black ink pads, for the focal point. The sentiment is inked in Baby pink and then I took the black pen and colored over the X and O before I stamped it on white card stock.

Find inspiration everywhere! Go... Create something fun & fabulous. Enjoy!
Related Posts Plugin for WordPress, Blogger...