Monday, November 21, 2011

Circular Christmas cards


I designed these two circular cards using Cricut and design studio with the Christmas cheer cartridge. They are simple and cute. Four inch circles fit inside of a standard envelope for easy mailing or giving. I like using the cut pieces from one card to decorate the other. Interchangable decorative pieces. No waste, thats a good thing. Add a little twine and some red stickles and they are ready to go.

Find inspiration everywhere! Go... Create something fun & fabulous. Enjoy!

Sunday, November 20, 2011

Kraft-y Christmas cards

This is my favorite color combination right now. Kraft, red and cream. I have been pinning it like crazy on my card ideas board on Pinterest here. This card idea I have had on there for a while, I finally got around to trying the design for myself.


I made one kind of blingy, with the gold stickles and the gold glimmer mist spray. I also made one more grungy with the walnut stain inked edges and walnut stain spray.


I designed this simple card on the Cricut with design studio, using George basic shapes cartridge. If you would like to play around with it and your favorite color combination I am happy to share my .cut file. Leave me a comment here on this post, including your email address and I will send it out to you.

Find inspiration everywhere! Go... Create something fun & fabulous. Enjoy!

Wednesday, November 16, 2011

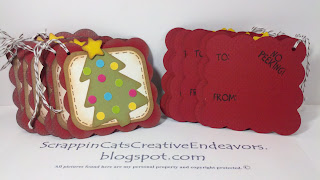
Christmas gift tags


I was inspired to create these Christmas gift tags by a picture posted on Pinterest here. I created my .cut file in Design Studio for the Cricut using Christmas cheer and A childs year. Super simple but oh so cute, I think.


I also created these on the same .cut file, using the same papers and general idea. I think they turned out pretty cute. I purchased some kraft gift bags at Dollartree today, I see some matching gift bags in my future. I will certainly post if and when I complete them.

As always, if you want the .cut file for these, I am happy to share. Leave a comment on this post with your email address and I will send it out to you.

Find inspiration everywhere! Go... Create something fun & fabulous. Enjoy!

Tuesday, November 15, 2011

Floral birthday card & gift card holder


I was inspired to create this birthday card from a card I pinned on Pinterest, here. I find such wonderful inspirations on the internet, and now I have all these beautiful photos in one place. It's awesome!

I used a Martha Stewart border punch for the flowers. I used scraps from my birthday card organizer I created recently, you can see it  here. I placed all the flowers out in a pattern I was happy with and then using this awesome tool my mom got me, the Quickutz quick stik, I picked up a flower at a time and dotted a little glue down and then placed the flower back down. I popped up the word on dimensionals and added a dot of Stickles Glam pink to the center of each flower.


The gift card is also inspired by a Pinterest find, you can see it here.

Happy birthday, Ang! We are so happy to be celebrating you on this big day, and every day. Our miracle girl. I know you are truly enjoying every moment......but birthday week is the best!


Find inspiration everywhere! Go... Create something fun & fabulous. Enjoy!

Monday, November 14, 2011

Santa bottle and tags


I have seen a ton of these altered Starbucks Frappacino bottles, and been dieing to try them. I finally did it, and donated this set as a drawing prize for the card class I assisted in. I was first inspired by the photos pinned on Pinterest here and here.

I cut all the parts for my tags on the Cricut using George basic shapes cartridge on the Design studio. So if you would like the .cut file for them, please leave a comment here on this post. Be sure to leave your email address and I will send the .cut file out to you.


Find inspiration everywhere! Go... Create something fun & fabulous. Enjoy!
Sunday, November 13, 2011

Popper party favors


I have not posted in a long time. Not because I have not been playing with paper and crafty goodness. I have. I just got caught up in preparing for the Christmas card class I assisted in. It was yesterday, it was fabulous. We had a great time and made some great stuff and ate some great food. Whew, I am glad its behind me. That's a lot of work.

These cute favors all started from the cute SU! Sizzix die cut. I wrapped some DCWV Christmas papers around the middle and tied a simple polka dot ribbon bow. The tag is stamped on white cardstock and layered on green cardstock set with an eyelet and tied in with twine. Simple and cute.


Maybe this angle makes them easier to see. Cute, huh? Filled them with some candies and Voila! Fun little favor.

Find inspiration everywhere! Go... Create something fun & fabulous. Enjoy!

Thursday, November 3, 2011

Halloween Hersheys kisses holder

I made these cute Halloween Hershey's kisses treats for friends and co-workers, I didn't post pictures of them before the holiday so that I could keep the surprise. I pinned the tutorial here a while ago. Thinking these would be great for any holiday.

I wish I had remembered to take a photo of one of the holders opened up because I changed it from the original tutorial. The BOO pieces were cut on the Cricut using Art Philosophy cartridge and after layering the white and black pieces together I used mini pop dots only along the bottom so that the top flap slides behind it to hold it closed. So when you open it you don't have to tear it apart.

Find inspiration everywhere! Go... Create something fun & fabulous. Enjoy!
Related Posts Plugin for WordPress, Blogger...