Showing posts with label papertrey ink. Show all posts

Sunday, August 9, 2015

French swirls background card


I made these cards a while back. After Rubber Stamp Convention in Sac, where I had purchased this Deep Red French Swirls background stamp. I stamped it using my MISTI and Momento Tuxedo Black ink. I used CTMH epoxy dots to add the ombre effect with the dots. Layers and layers of card stock and a bow and its all done. A simple but elegant note card. 


Same idea here, just a change up of colors and the addition of a sentiment on the front. (Sorry for the blurry pic.)

I absolutely love this stamp. And the MISTI allowed me to stamp multiple times to get the deep dark all over image. I love it!


Find inspiration everywhere! Go... Create something fun & fabulous. Enjoy! 

Saturday, July 18, 2015

Mother's day card & gift bag


Of course I finally order (and subsequently fell in love with) SU! Stippled Blossom just a month or two before they discontinue it. True I can continue to create with it for my own use, but I can't show my friends and have them fall in love with it too, because that would just be mean. But for everyone who already owns it, isn't it awesome? I know, I'm late to the party. As usual.

This is the card I made for my mom for Mother's Day. Her last name is Rose. Her favorite flower is Rose. So I thought this was perfect. 


I used the top stamp layer only, the stippled design. And I stamped twice with SU! Real Red ink to get the two tones. Same with the leaf stamp, only using SU! Wild Wasabi ink. I had done the old masking using a post it note trick. I had punched out a circle and masked where I wanted my sentiment. This sentiment is from Paper Trey Ink. 


The inside sentiment and shape around it is from CTMH. I have had it for a long while, so I'm not at all certain they still sell it. I stamped both the sentiments using my MISTI so that I could stamp them multiple times to get a super deep red color. 


This is the decorations I put on a plain kraft gift bag. I used some discontinued SU! Real Red ribbon to made the bow. 


I layered many paper and silk flowers from my stash and put a long since discontinued SU! brad through the centers of two of them.


Find inspiration everywhere! Go... Create something fun & fabulous. Enjoy! 

Tuesday, June 30, 2015

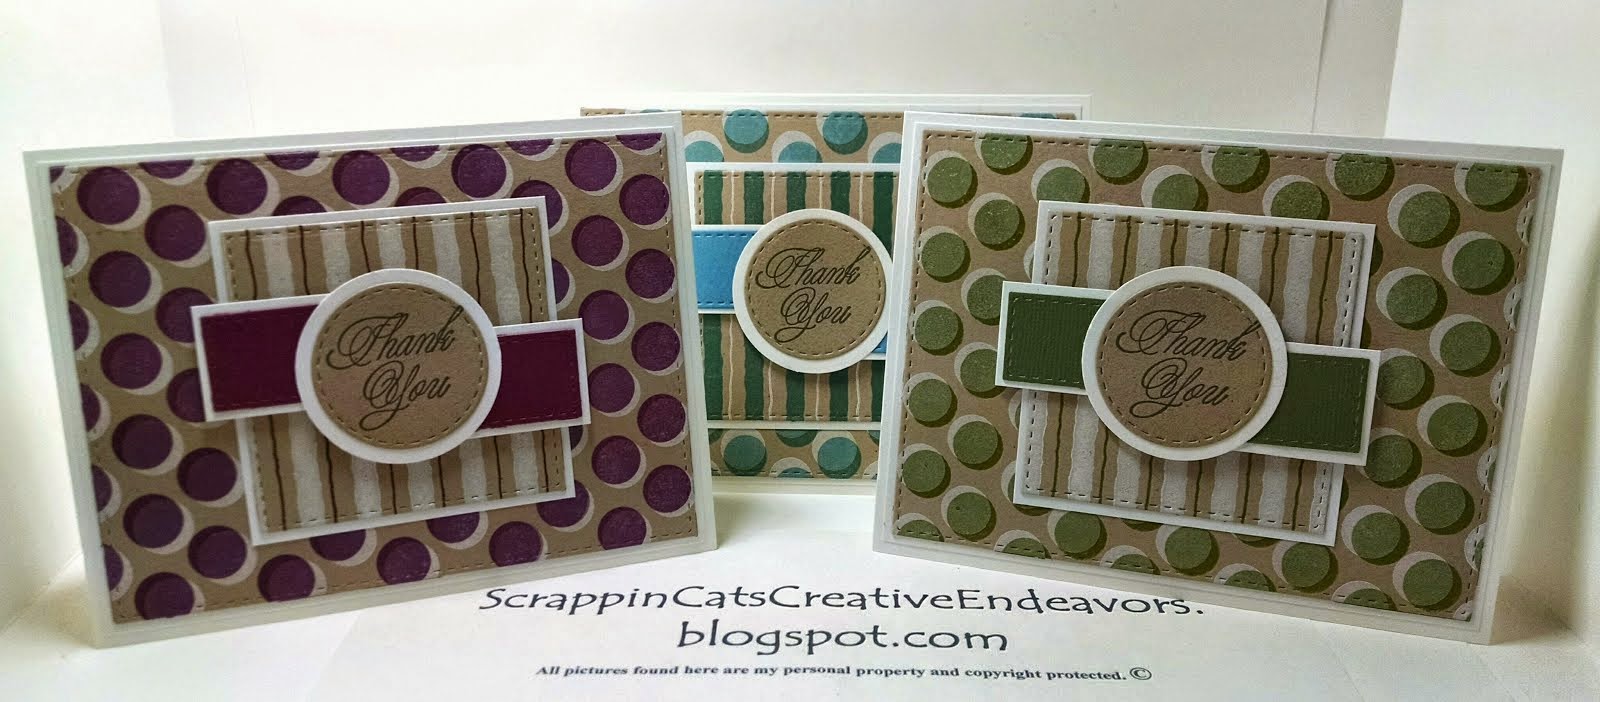
Ghost technique polka dot cards


I was playing around with my Misti and Paper Trey Ink polka dot background stamps. Trying my hand at the ghost technique. My inspiration came from this card on Pinterest.


SU! Crumb Cake and Whisper White papers used on all of the cards. This one adds SU! Garden Green ink and paper. 


This is Island Indigo. 


And finally Rich Razzleberry.

Pretty and simple cards. I enjoyed my first attempts at this style of ghost technique.


Find inspiration everywhere! Go... Create something fun & fabulous. Enjoy! 

Tuesday, June 9, 2015

Polka dot birthday cards


These are some gorgeous backgrounds created with my MISTI and Papertrey Ink Polka Dot Background stamps. I am loving this set again. Supe-dee-duper easy to line up and stamp (and stamp again if needed) with the MISTI!!! Yahoo!


Goodness, I made these a month ago or more, so I am guessing at the colors now. I believe this is SU! Calypso Coral. On all three of these cards I added some SU! Petite Petals, ribbon and lace. The sentiments are from Papertrey Ink. 


This I believe to be stamped in SU! Coastal Cabana.


And finally SU! So Saffron. The smaller the background polka dots got the harder it was to get them perfectly lined up and repeated for a full background of polka dots, but this is still WAY better than what I could have managed stamping them with a block.

Thanks for the visit. Sorry for the long delay between posts. 


Find inspiration everywhere! Go... Create something fun & fabulous. Enjoy! 

Monday, May 13, 2013

Washi tape banner thank you cards


I had a lot of wonderful people to thank for helping me celebrate my birthday to its fullest. I was able to use my favorite Washi tape and a bunch of card bases I had picked up on clearance from Joanns and coordinating bakers twine to assembly line produce these cards while still being able to personalize them a little for each person. 


I am sure you are shocked to find out that these card designs were inspired by this card on Pinterest. Sweet and simple and using many items from my collection of crafting supplies. Perfect. The sentiment is from Papertrey Ink and the little heart is punched from SU! heart trio punch.


Find inspiration everywhere! Go... Create something fun & fabulous. Enjoy! 

Saturday, April 27, 2013

Pinterest inspired cards


I have been so inspired lately by Pinterest. There are so many talented people out there sharing their art and creations all over the internet but without Pinterest I never would have seen so many of them.

The first card I recreated was inspired from this beautiful card. As you can see I did my best to mimic it without much changes because it was perfection and I really loved every aspect of it. The colors used for this card are CTMH inks in Pear, Blush, Cotton Candy and Crystal Blue. I used SU! Vintage Vogue and Papertrey Ink sentiment for the images. A Martha Stewart butterfly punch and some Stickles for bling is all I used to finish this off.


This card was created from this Pin-spiration. I didn't have the exact flower stamp the creator used but I liked my substitute. For this card I used CTMH inks in Crystal Blue, Star Spangled Blue and Outdoor Denim on SU! flower stamp and Papertrey Ink sentiment. Some pearl centered brads and a little cotton crochet ribbon from Really Reasonable Ribbons monthly club selection and I call this done.


I loved this simple beauty, and couldn't wait to ink up the SU! oldies but goodies. I have had these stamps since 2004. Glad to bring them out again for this cute card. This was stamped in CTMH Cotton Candy and Pear inks. The sentiment is from the same Papertrey Inks sentiment stamp set. Love the combination of plain type and cursive sentiment. I added some Hobby Lobby gingham ribbon and Stickles for a finishing touch. 


Find inspiration everywhere! Go... Create something fun & fabulous. Enjoy!

Saturday, January 22, 2011

Valentine's heart couple cards


This darling idea came to me via lovetostampandscrap.blogspot.com. But she links up to other blogs and finally to an amazing video tutorial at valitasfreshfolds.blogspot.com, this lady is amazing! I am so envious of creative minds like hers. And extremely thankful for her filming amazing tutorials and sharing them for free on the internet. Thank you, thank you, thank you!
So as is my habit, I went a lil crazy making these adorable couples. I do not have the SU! heart punch and scallop envelope die so I designed the hearts and circles and even the knock off scallop envelope on my Cricut design studio. And my thinking was if I'm going to load up four different colors of cardstock I might as well make multiple cards. Voila! There you have it. Cathy logic in a nut shell.

Couple number 1. Using a Papertrey Ink sentiment stamp and some lovely sheer red with polka dots ribbon.

Here is a view to attempt to show you the layers and pop dot effects. It's really a cool card in person. Very detailed and complex. The background of all four cards is SU! cherry cobbler cardstock stamped with Papertrey Inks background basics texts styles stamp in their fresh snow ink pad. The SU! black cardstock is run through the Cuttlebug with my fave swiss dot embossing folder.

Couple #2. Using SU! sentiment from Three little words set and black polka dot grosgrain ribbon.

Couple #3. Using a Michaels dollar bin sentiment stamp and the same black polka dot grosgrain ribbon.

Couple #4. Using a StampingScrapping.com sentiment stamp and the same ribbon, but an attempt at a tuxedo bow tie effect. I didn't like it so I did not repeat it on the rest.
Three of the cards have Happy Valentine's Day sentiment inside, but this one....this is my favorite. I put the tiny Happy Valentine's Day on the outside and this sweet SU! sentiment on the inside.

I am happy to share my .cut file with anyone who would like it. Please leave a comment on this post (including the obvious, hee hee, but oft forgotten email address please) and I will send it out pronto. I bet you will want to make 1 for your sweetheart, and a few extras to share with less crafty friends or coworkers or strangers on the street if like me you went way overboard. ;)
Find inspiration everywhere! Go... Create something fun & fabulous. Enjoy!

Wednesday, December 29, 2010

Pop up WOW ornament


Here is the pop up WOW ornament. Isn't it cute? Yeah, I know...not too much WOW yet. But you just wait.

This is the backside of the adorable little ornament.


WOW! See, what it unfurls to? A big beautiful ornament. I found this fabulous tutorial on youtube,
pop up WOW ornament by stampwithtami. You know how I love my video tutorials. This one makes it quick and easy to create these ornaments.


Here's a close up shot. I went for a Valentines theme since I found this video after Christmas. I think it's just as cute all decorated with hearts, as the tutorials snowflake themed ornament.

This is a view of the sides. I stamped the front with a CTMH heart stamp in CTMH tulip ink. The sides are stamped with Papertrey inks all over background hearts in CTMH baby pink. I cut my squares 3.25 inches and then punched all the way around the edges with a new Martha Stewart border and corner punch.

This is a direct over the top picture.  Maybe you can see the lacy edges a bit better and notice also the pink inked edges of all the pieces.

And a side long view. You see my heart background more clearly here. I think this is a fun, simple origami project. I hope you check out the video and give it a try for yourself.

Find inspiration everywhere! Go... Create something fun & fabulous. Enjoy!

Saturday, May 29, 2010

Neon gift box- holds 6 cards and envelopes

For this gift box I used one 8.5x11 sheet of paper for the base of the box and another for the lid.

For the base: start with 8.5 inch side to the top and score at 1.75 and 6.75. (for scorpal users I moved the paper over to the ¼ in mark and scored on the 2 and the 7 inch lines.)

This is just a close up.

Flip the paper to the 11 inch side towards the top and score at 2.5 and 8.5 inches. Fold and sharply crease at each score. Cut corners to make tabs as shown.

Fold corner tabs under to make it easier to score the large tab sections as shown.On the largest tab line up at 1.5 inch line on your scorpal and score on the 2 1/8ish line as shown.

Run tape on 3 sides of largest tab.

Fold long sides up with the cut tabs towards the inside of box. Line up outer edges with taped edge of largest tab.

Fold over the taped edge. This is what it looks like on the inside now. Do the same on the other end. Now your base is complete.

It holds 6 envelopes and 6 (fully embellished) cards with room to spare.

For the lid do exactly the same, just moving your score lines approximately 1/16th of an inch over so the lid is slightly bigger than the base. As you can see below the tabs now have about a .25 inch gap. This just makes the lid slide easier down over the base.

The layers I used to decorate my lid are: 4.75x5.75 inches for the first layer. 4.5x5.5 for the 2nd layer. 4.25x5.25 for the top layer.
Decorate as you desire. Mine matches my cards almost exactly.

Give away and watch for the smiles. I am taking mine to a Memorial Day celebration as a token of my appreciation to the hostess. Have a fabulous weekend. Enjoy!
Related Posts Plugin for WordPress, Blogger...