Tuesday, November 29, 2011

Another cupcake tray


Another cupcake tray?!?! I know, I know, I am going a bit bonkers over these. They are so cute, and easy. I am loving making them.


Here it is naked. No candy covering up it's cuteness. These plates came from Walmart and I used another Dollar tree candle stick, this time spray painted white.


Just a close up of the spray painted candle stick attached to the plates.

Find inspiration everywhere! Go... Create something fun & fabulous. Enjoy!

Monday, November 28, 2011

Snowflake Christmas cards


I love snowflakes. I must have 4 or 5 different stamp sets of snowflakes. So when I saw this unique card trio I repinned it on Pinterest here, just so I could copy the design for a set of my own. I loved everything about her original cards. The monochromatic color scheme, the minimal embellishment, yet they were still so striking to me. So I changed very little of her original design. (In my humble opinion, that is the sincerest form of flattery.)

The first set of cards I made are with a CTMH stamp set that (I believe) is no longer available. It's called New fallen snow, and I think they are gorgeous and ornate and I love them.


Here is a close up, you can't see the glimmer mist but its there and I also added some CTMH Glitz to the center of each snowflake. All of the inks I used are CTMH as well as the cardstock layers. These colors are from lightest to darkest, Sweet leaf, Topiary and New England ivy.


Here is the second set I made with a current CTMH stamp set. It is called Snow flurries. Smaller, cute but not as striking as the first set. All of the sentiments came from CTMH stamp sets Snow flurries, Peace on earth, Festive thoughts or Card chatter - Christmas.


Here is a close up of this set. These colors are Baby pink, Blush and Hollyhock. Again some Glimmer mist and a little dot of Glitz to the snowflake centers. 


Here is a close up of the inside, this blue color scheme is stamped in Heavenly blue, Juniper and Twilight inks.

I decorated the insides, because that is what the designer did, and I thought it was beautiful. I usually just stamp a sentiment and be done with it. But I really liked the added stamping on the inside.

Find inspiration everywhere! Go... Create something fun & fabulous. Enjoy!

Sunday, November 27, 2011

Recycling empty jars for gift giving


I have discovered the wonder that is spray paint. I have been intimidated by it for a long while, but no more! I watched a few you tube videos and gained some confidence to give it a try. Now I can't stop myself, if it doesn't breathe or move fast enough I may paint it bright Banner red!

The jars you see above are empty jelly and maraschino cherry and lemon curd jars. I really like the jars that have some shape and variation to them.


I intend to keep a few of these jars for my Disney themed craft room, so when I saw these jars here I knew Banner red was not enough for me. As pretty as it is, polka dots are better. Always! Well, not in the case of chicken pox but all other polka dots are a major improvement over plain.

The spray painted lids had dried for over 24 hours. I took the non brush end of a paint brush and dipped it in Delta Ceramcoat acrylic paints in Magnolia white and then touched the end down to the lid. The more pressure I applied the bigger the first dots, but also as I repeated dotting without re-dipping the dots got smaller. FUN!!!


See! Aren't they adorable? I am going to love filling these with silk flowers I buy at Dollar tree and remove from the stems. This will be great storage and so cute too.

Find inspiration everywhere! Go... Create something fun & fabulous. Enjoy!

Saturday, November 26, 2011

Cupcake stands


I am so excited about these cupcake stands. I absolutely love them, its going to be tough to give them away.

I have pinned several variations of these stands on Pinterest, the one that most resembles this project is pinned here. Using inexpensive melamine type plates of varying sizes and some glass candle holders to create darling tiered stands.

I found these 3 adorable plates at Hobby Lobby (my new FAVORITE toy store) for 50% off. ALREADY!!! And they are so unique, bright, and cute. So for around $8.00 I made this gift.


Here is a detail shot of the candle holder. It is glass, and then I painted it with Krylon indoor/outdoor gloss spray paint. Then I used E-6000 glue to attach it to the plates. I decided to flip the candle sticks over so the narrower end was glued to the plate where you would be stacking stuff, more room for stuff. That's always a good thing. Especially when the stuff is candy, or cupcakes, or cookies, or truffles, or ......well you get the idea.


This stand is two plates from Walmart and a small bud vase from Hobby Lobby used as the column. This was under $4.00 to make.


Again a detail shot, narrower end down for more room and glass vase spray painted to match the plates. I am loving these projects. So cute.

Find inspiration everywhere! Go... Create something fun & fabulous. Enjoy!

Friday, November 25, 2011

Floral banner card


Happy, happy birthday to my mom. I was inspired to make this card for her from a card I originally saw here. I changed up the color scheme because my moms favorite color is blue. I punched a bunch of different blues and also white using a Martha Steward border punch. I needed lots of cute little flowers for this banner. I swirled on some liquid glue in the shape I wanted the banner to be and then just sprinkled the flowers over the top of the glue. Just a little scooting and filling in was needed, then I let it dry. I added CTMH sprinkles in blues all around the banner and a dot of liquid pearls to the centers of some of the flowers. I created a little banner and stamped it with CTMH Star spangled blue using a discontinued CTMH sentiments and shwoopies stamp set.


Here is a close up to show the details. This was an effective way to lay down a lot of tiny punched shapes. The glue is completely covered and dries clear, so you just see an abundance of flowers. Cute. I think this would be cute with hearts too.

Find inspiration everywhere! Go... Create something fun & fabulous. Enjoy!

Thursday, November 24, 2011

Ornament necklace


Pinterest strikes again. I have a bunch of these ornaments from the Dollar tree, in several sizes. I want to fill some apothecary jars with them, I want to hang them from the ceiling on ribbon in front of windows and now I am going to hang these around my neck. All because of Pinterest. I re-pinned this idea here, and within minutes I had a cute, festive, holiday necklace. Yahoo!!!!

Find inspiration everywhere! Go... Create something fun & fabulous. Enjoy!

Wednesday, November 23, 2011

Glitz-y cards


I like this simple card design. The paper gets to be the star and then there are pretty touches that enhance it. As soon as I first saw this card here I knew I had some great papers to use for my versions of this card. One for Thanksgiving and one for Christmas.


First I used my little rolling piercing tool with my Scor-pal and pierced the edges of the ivory layer. Then I stamped and cut out a sentiment with an oval nestability, then leaving the nestability in place I used a sponge and some of the CTMH Sahara sand ink to sponge inside the oval around the sentiment. Then I punched two holes in the oval and threaded bakers twine through them. I popped dotted the oval on and wrapped the ends of the twine to the back of the kraft layer.  Finally I used CTMH Glitz in bronze on the leaves, I put a dollop in the center of the leaf and used a toothpick to pull it out to the points and edges.


This card had all the same steps as above, only using CTMH heavenly blue ink and Glitz in stardust. I think they are simple and sweet. I can see this design being used over and over by myself.


If you want to CASE this design I will share the measurements to make it simple for you. The card is a standard A2 at 4.25 x 5.5 inches. The first layer is 4 x 5.25 inches. The white/ivory layer is 3.75 x 3.75 inches, piercing at 1/8th of an inch around all four sides. The three strips of patterned paper are 1 x 3.25 inches. I used the closest nestability size to my sentiment size.


Find inspiration everywhere! Go... Create something fun & fabulous. Enjoy!

Tuesday, November 22, 2011

Candy cane place card holders


Woo hoo!!! I am super excited about this cute little project. Thanks Brandy for the inspiration. I also pinned a tutorial here on Pinterest. They both used real candy canes, cute but only useful for 1 season (and you can't even eat them in the end) *gasp*. Mine solve both of those dilemmas.

All of these little place card holders were made with $3.00 of supplies from Dollar tree. Yahoo! The plastic candy canes were part of a garland, and when I was looking at them I just knew they would pop off of the little bead garland string easily. I was right. The poinsettias were from a spray of silk flowers I just pulled off the flowers and tossed the plastic parts.


Here is a close up, detail shot showing the little cutey holding a tag cut using the Cricut Art Philosophy cartridge. You can see I doubled up the poinsettia flowers, then I ran 1/4 inch ribbon throught the hole and looped it around the back of the canes, tying it tight from the front. So now I can even change out the embellishments from year to year if I like.

The finished candy cane place card holders are about 4 inches tall. I believe they will be adorable on my Christmas dining table.


Find inspiration everywhere! Go... Create something fun & fabulous. Enjoy!

Monday, November 21, 2011

Circular Christmas cards


I designed these two circular cards using Cricut and design studio with the Christmas cheer cartridge. They are simple and cute. Four inch circles fit inside of a standard envelope for easy mailing or giving. I like using the cut pieces from one card to decorate the other. Interchangable decorative pieces. No waste, thats a good thing. Add a little twine and some red stickles and they are ready to go.

Find inspiration everywhere! Go... Create something fun & fabulous. Enjoy!

Sunday, November 20, 2011

Kraft-y Christmas cards

This is my favorite color combination right now. Kraft, red and cream. I have been pinning it like crazy on my card ideas board on Pinterest here. This card idea I have had on there for a while, I finally got around to trying the design for myself.


I made one kind of blingy, with the gold stickles and the gold glimmer mist spray. I also made one more grungy with the walnut stain inked edges and walnut stain spray.


I designed this simple card on the Cricut with design studio, using George basic shapes cartridge. If you would like to play around with it and your favorite color combination I am happy to share my .cut file. Leave me a comment here on this post, including your email address and I will send it out to you.

Find inspiration everywhere! Go... Create something fun & fabulous. Enjoy!

Wednesday, November 16, 2011

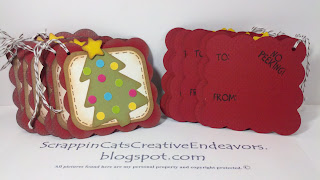
Christmas gift tags


I was inspired to create these Christmas gift tags by a picture posted on Pinterest here. I created my .cut file in Design Studio for the Cricut using Christmas cheer and A childs year. Super simple but oh so cute, I think.


I also created these on the same .cut file, using the same papers and general idea. I think they turned out pretty cute. I purchased some kraft gift bags at Dollartree today, I see some matching gift bags in my future. I will certainly post if and when I complete them.

As always, if you want the .cut file for these, I am happy to share. Leave a comment on this post with your email address and I will send it out to you.

Find inspiration everywhere! Go... Create something fun & fabulous. Enjoy!

Tuesday, November 15, 2011

Floral birthday card & gift card holder


I was inspired to create this birthday card from a card I pinned on Pinterest, here. I find such wonderful inspirations on the internet, and now I have all these beautiful photos in one place. It's awesome!

I used a Martha Stewart border punch for the flowers. I used scraps from my birthday card organizer I created recently, you can see it  here. I placed all the flowers out in a pattern I was happy with and then using this awesome tool my mom got me, the Quickutz quick stik, I picked up a flower at a time and dotted a little glue down and then placed the flower back down. I popped up the word on dimensionals and added a dot of Stickles Glam pink to the center of each flower.


The gift card is also inspired by a Pinterest find, you can see it here.

Happy birthday, Ang! We are so happy to be celebrating you on this big day, and every day. Our miracle girl. I know you are truly enjoying every moment......but birthday week is the best!


Find inspiration everywhere! Go... Create something fun & fabulous. Enjoy!

Monday, November 14, 2011

Santa bottle and tags


I have seen a ton of these altered Starbucks Frappacino bottles, and been dieing to try them. I finally did it, and donated this set as a drawing prize for the card class I assisted in. I was first inspired by the photos pinned on Pinterest here and here.

I cut all the parts for my tags on the Cricut using George basic shapes cartridge on the Design studio. So if you would like the .cut file for them, please leave a comment here on this post. Be sure to leave your email address and I will send the .cut file out to you.


Find inspiration everywhere! Go... Create something fun & fabulous. Enjoy!

Sunday, November 13, 2011

Popper party favors


I have not posted in a long time. Not because I have not been playing with paper and crafty goodness. I have. I just got caught up in preparing for the Christmas card class I assisted in. It was yesterday, it was fabulous. We had a great time and made some great stuff and ate some great food. Whew, I am glad its behind me. That's a lot of work.

These cute favors all started from the cute SU! Sizzix die cut. I wrapped some DCWV Christmas papers around the middle and tied a simple polka dot ribbon bow. The tag is stamped on white cardstock and layered on green cardstock set with an eyelet and tied in with twine. Simple and cute.


Maybe this angle makes them easier to see. Cute, huh? Filled them with some candies and Voila! Fun little favor.

Find inspiration everywhere! Go... Create something fun & fabulous. Enjoy!

Thursday, November 3, 2011

Halloween Hersheys kisses holder

I made these cute Halloween Hershey's kisses treats for friends and co-workers, I didn't post pictures of them before the holiday so that I could keep the surprise. I pinned the tutorial here a while ago. Thinking these would be great for any holiday.

I wish I had remembered to take a photo of one of the holders opened up because I changed it from the original tutorial. The BOO pieces were cut on the Cricut using Art Philosophy cartridge and after layering the white and black pieces together I used mini pop dots only along the bottom so that the top flap slides behind it to hold it closed. So when you open it you don't have to tear it apart.

Find inspiration everywhere! Go... Create something fun & fabulous. Enjoy!
Related Posts Plugin for WordPress, Blogger...