Sunday, December 19, 2010

Slip cover Santa box

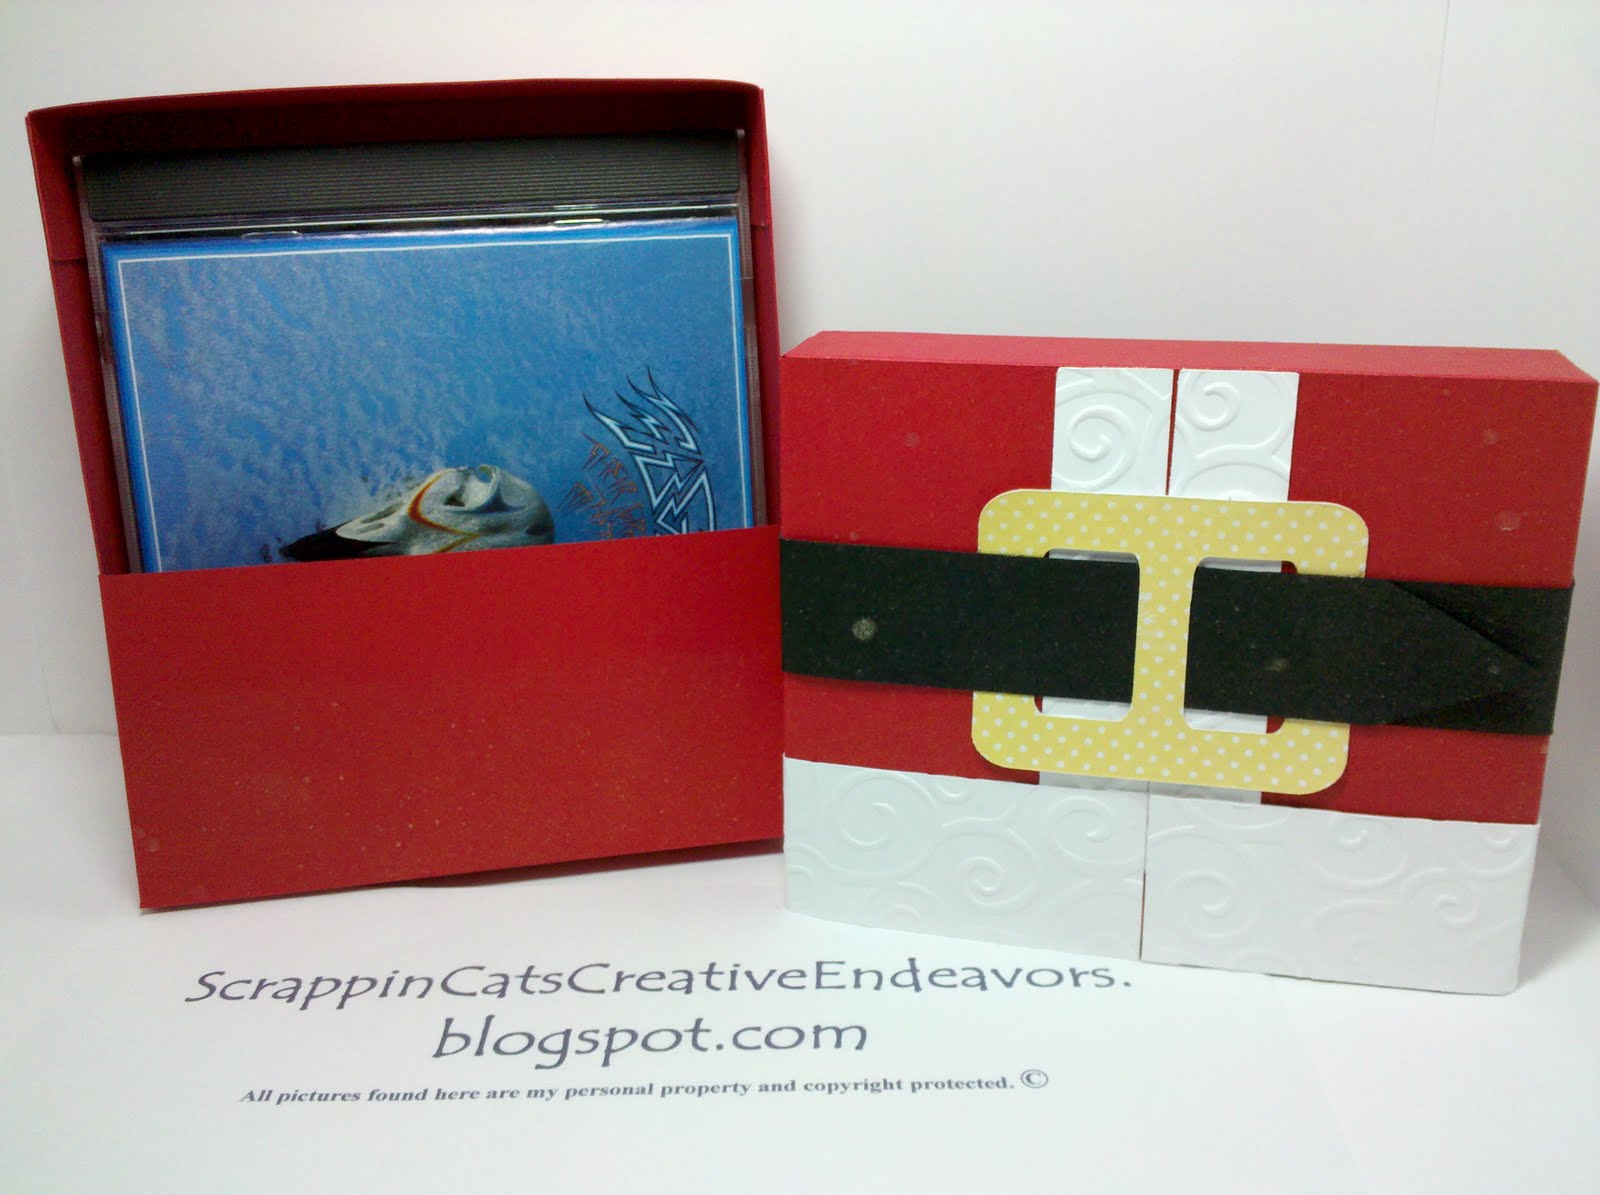
This is my interpretation of the Santa suit front that is really popular this year. I made mine into a slip cover box, big enough to hold a cd inside. I did use my Cricut and Design studio with George basic shapes cartridge for this project. In my .cut file I included the belt, buckle and fur trim pieces, but just leave those off and use this slip cover box any time of year. I used SU! Real red cardstock, as I love to do when making boxes. They always turn out very sturdy. After I assembled all the pieces I gave it a generous spritz of Glimmer mist. In my world Santa shimmers.

Here is a view of the box lid slipped off and you can see the interior and the CD. I think its such a cool wrapping idea. Really bumps up the cuteness factor.

As always, I am happy to share my .cut files with you. Leave a comment (don't forget the important email address) and I will send it out to you.

I hope you are having a Merry (crafty) Christmas.

Find inspiration everywhere! Go... Create something fun & fabulous. Enjoy!

Mini milk cartons with a crate for 4

This is an oldy but a goody. I love this lil gift packaging idea. It is fairly simple but packs and adorable punch. This will make a cute gift for our neighbors, I filled each carton with a single Ghirardelli's chocolate square and 4 chocolate kisses.  

Refer back to this post for the assembly instructions.

This is an upgrade to my earlier .cut file. I added a crate that will hold 4 mini milk cartons. If you would like my .cut file I would be happy to email it to you. Please leave a comment on this post (include your email address) and I will send it out to you.

Find inspiration everywhere! Go... Create something fun & fabulous. Enjoy!

Saturday, December 18, 2010

Snowflake acetate card

This just may be the prettiest card I have ever made. I case'd (copy and share everything) this beauty from anotherdayanothercard.blogspot.com . It's a 4.5 x 4.5 inch scallop card base, I cut it with SU! large scallop square. Then I layered a square of blue cardstock and a slightly smaller square of white cardstock stamped all over with CTMH snowflake border stamp.

Over the white snowflake paper is a piece of recycled acetate (recovered from some packaging), all the layers are held together with 4 mini silver brads in the corners. I pop dotted it up off the card base. The front of the acetate is embellished with snowflakes, gems, the stamped and punched out sentiment and finally some gorgeous semi sheer white and silver ribbon, once again from my monthly ribbon club from Reasonable ribbon.
Everything has the added shimmer of Glitz from CTMH. I received my bottle in my last order and am appalled that I let it sit there unused all this time. It is the prettiest glitter glue product I have ever seen. And its easy to use, and it dries fast. It's a major win win situation.

This is the inside, decorated with some of the border and glitz from the front of the card. Everything was stamped with CTMH Heavenly blue ink.


Here is a picture of the never to be neglected again, bottle of glitz. I highly recommend it.

Find inspiration everywhere! Go... Create something fun & fabulous. Enjoy!

Christmas tree 5 x 7 Christmas cards

More vacation crafting goodness! More Cricut crazy goodness. Somebody stop me. No really don't, I'm having way too much fun.

I decided to crack open another new cartridge. This gorgeous Christmas tree is cut from the Christmas cartridge. I used Design studio to create the 3 layers at 3.5 x 5 inches. I made it big because I was afraid of that shwoopy-licious top layer. I haven't had much luck cutting out such intricate designs. I studied up on capadiadesign.com suggestions.  I got out a new mat, a new blade, checked all my machine settings and I cut the design as big as I thought my card would allow. I also used black SU! cardstock and white CTMH card stock. I must say the black cut like butter, the white was not as fantastic. Too bad. Capadia designs also suggested a 2 inch plastic putty knife from the hardware store. It helped immensely when removing the intricate design from the new mat. I didn't lose a single shwoopy. Yea me! 
Here is the first of two cards. There is a black solid layer, a white shadow layer and the top black layer is the most delicate to the Christmas tree. I pop dotted those up from a miscellaneous piece of dark green card stock and layered that on another piece of black. I think i counted 23 gems in 3 different sizes and 9 pop dots all total for this card. But it is so pretty and elegant in person. (If I do say so myself.)  

Here is an angled close up to give you a different perspective on the layers and the details. The ribbon I tied across the bottom was from Reasonable ribbons. I bought 10 yards of this sheer shwoopy ribbon because I loved it so much and it was a great price.  

This is the second card. I love this color combination. SU! Cherry cobbler and black card stock. This one is layered exactly opposite. White solid layer, black shadow layer and white top layer for the Christmas tree. To it I added red prima flowers and black gems and stickles. The black velvet ribbon is from Michaels as is the stamp I used in the upper corners.

Another angled close up for more details.

Find inspiration everywhere! Go... Create something fun & fabulous. Enjoy!

Treat bag

Woo Hoo!!! I have gone Cricut crazy. This is another project designed and cut on my Cricut. I used Design studio with George basic shapes cartridge to design this candy treat bag/box/favor thingy. I got the inspiration from nicoleheady.typepad.com new product release announcement. They have a steel die to cut out the pieces to make a little treat bag similar to this. I knew I could do it on my Cricut. And I was right. The proof is in the pudding, so they say. (Sorry, its late and I'm a little rummy. Which causes me to be silly.)


Here is a view from the side. My finished bag is 4 x 4.5 x 1 inches. I ran the two side pieces through the cuttlebug using an embossing folder. I used the technique my friend and SU! demonstrator Tina taught us recently. I cut a 2 x 2 square in the center of several pieces of cereal box pieces, then glued them together. Now when you put this chip board cut out shape centered over the piece of paper on top of your embossing folder there remains a nice flat spot for stamping, with the embossing pattern all around it. Very cool effect I believe. Then I used a quarter of a round sponge and CTMH star spangled blue ink to highlight the embossing. Add some dark blue stickles and some gorgeous ribbon from my Reasonable ribbon club and I thinks its pretty cute.

Once again, if you are so inclined leave me a comment (with your email address) and I can send you my .cut file for this treat bag.

Ho, ho, ho....vacation project number two. I'm loving it. I feel de-stressed and more peaceful already.

Find inspiration everywhere! Go... Create something fun & fabulous. Enjoy!

Friday, December 17, 2010

Card gift box

Yahoo!!! This afternoon is the beginning of my Christmas vacation. I am so excited. I see lots of crafty goodness in my near future. Interspersed with a touch of wrapping, a little baking, a smidge of house cleaning.....but mostly crafty goodness. Because I deserve it. I need it.

So to kick thing off this afternoon I played with a cartridge I haven't used yet. Love Struck. I opened it in Design studio and saw immediately the candy box. I tweaked it to fit a standard A2 sized card. Well, actually 4 cards and 4 envelopes. For the box embellishing I used George basic shapes cartridge.

Here is the box end opened and 4 cards and envelopes spilling out. Now I am actually going to use this box and a few more for a few of the smaller Christmas presents. None of which include cards. This time.... ;)

Oops, almost forgot to offer the .cut file to anyone who would like it. Just leave me a comment (with your email address) and I will send it out to you.

Merry Christmas. I hope you are enjoying the season.

Find inspiration everywhere! Go... Create something fun & fabulous. Enjoy!

Thursday, December 16, 2010

Snowman treat bags

I found this cutie patootie treat bag this evening while perusing some of my favorite inspiration blogs, this one is found at wizardshangout.blogspot.com her 11-28-10 post. It sounds like she discovered it on another blog and had to copy it. He was so adorable I just had to make one also.
Then as is my way, I went a tad crazy and created 10. Enough to share with some of my favorite people in my office.
I followed the instruction for making the basic bag shape, I changed up his face a little bit. I used 1/2 inch circle punch to create all the coal. The carrot is a heart punch that I folded in half. The ear muffs are a 3/4 inch by 7 inch strip and 2 cute pom pom's.

He's cute enough all on his own, but full of chocolates and smelling heavenly I hope the recipients love him all the more. I know I do. I love you cutie patootie snowman!

Find inspiration everywhere! Go... Create something fun & fabulous. Enjoy!
Related Posts Plugin for WordPress, Blogger...