Wednesday, December 29, 2010

Pop up WOW ornament


Here is the pop up WOW ornament. Isn't it cute? Yeah, I know...not too much WOW yet. But you just wait.

This is the backside of the adorable little ornament.


WOW! See, what it unfurls to? A big beautiful ornament. I found this fabulous tutorial on youtube,
pop up WOW ornament by stampwithtami. You know how I love my video tutorials. This one makes it quick and easy to create these ornaments.


Here's a close up shot. I went for a Valentines theme since I found this video after Christmas. I think it's just as cute all decorated with hearts, as the tutorials snowflake themed ornament.

This is a view of the sides. I stamped the front with a CTMH heart stamp in CTMH tulip ink. The sides are stamped with Papertrey inks all over background hearts in CTMH baby pink. I cut my squares 3.25 inches and then punched all the way around the edges with a new Martha Stewart border and corner punch.

This is a direct over the top picture.  Maybe you can see the lacy edges a bit better and notice also the pink inked edges of all the pieces.

And a side long view. You see my heart background more clearly here. I think this is a fun, simple origami project. I hope you check out the video and give it a try for yourself.

Find inspiration everywhere! Go... Create something fun & fabulous. Enjoy!

Thursday, December 23, 2010

Paper purse

This is a purse made from paper. Coach eat your heart out. ;)

I got my inspiration for this originally from apathofpaper.blogspot.com, but then I had to tweak it. I designed it to cut on my Cricut using my Design studio and my old fave George basic shapes cartridge. And I made it big enough to hold standard A2 sized cards and envelopes. 6 highly embellished (translates thick) cards and 6 envelopes to be exact.

Here is a view of the cards and envelopes inside this almost 2.5 inch thick purse.  

A side view. Yeah, in hind sight the base paper is too busy. Oh well, live and learn. It's certainly not a goner, and unfortunately I don't have 12 x 12 SU! cardstock. Looks like I am gonna have to get some. All I had to work with that I felt was sturdy enough was DCWV glitter stack. So I tried to coordinate. Epic fail as my sons would say. But I refuse to waste it, maybe its a purse only a mother could love.

Here is an adorable little pocket on the front of the purse. I ran the front, sides and flap through my Cuttlebug in a Sizzix embossing die. I didn't do the back side because it needs to adhere completely to the paper on the front of purse.  The pocket has a lil velcro closure. My thought was if I am giving a set of cards inside this purse, then I can include some postage stamps or stickers to close the back of the envelopes inside the pocket.

I created this .cut file to share, if you would like to create your own paper purses just leave me a  comment here with your email address and I will send it out to you. Merry Christmas. 

Find inspiration everywhere! Go... Create something fun & fabulous. Enjoy!

Tag-a-longs package

I saw this adorable package idea on artisticavenger.wordpress.com, her 12-22-10 post. I love the idea of a selection of gift tags inside, as she intended. Maybe next year, it is too close to Christmas this year for me to give this to someone, full of tags, and have it actually be useful.

So I went with my fall back plan. Chocolates. Probably because I would be thrilled to receive a cute package full of yummy chocolates. The .25 inch pocket holds a Ghirardelli's chocolate square perfectly, and the two larger pockets hold snack sized bars and Reese's peanut butter cups. Yum, making me hungry just typing about them.

Here is a view of the open package. It really is beautiful, the Teresa Collins Noel line of papers are super to work with. Gorgeous and sturdy, they make a great finished 3d item.

So check out artistic avengers tutorial, I love diagrams and pictures included with the written instructions. I did notice the score lines for the outside of the package say "score at 5 and 6 inches", but for all 3 pockets to fit I had to score mine at 4.25 inches and flip it 180 degrees and score again at 4.25 inches. I also learned the hard way to punch the holes for the handles through the interior liner paper (in my pics above, the red pieces) then when you adhere it to the interior of the outside piece you can line up the hole and punch again, through a single sheet of cardstock. That would have been much easier then the muscle and drama I went through. I also learned that by adhering all three pockets together and then adhering them to the bottom and back side of the outside piece, it would have been easier to put my super tacky red tape across the bottom and the back sides of the pockets. Then remove the red liner film only from the bottom, line them up perfectly and adhere them down, then remove the red liner film from the back of the pocket and press the back outside piece up to the back side of the pocket. I hope this makes sense. Just a few tid bits I learned, that will make this go together much easier next time.


Find inspiration everywhere! Go... Create something fun & fabulous. Enjoy!

Origami star on top of my tree

I decided my porcelain angel was not the look I had in mind for this years tree. I decorated almost totally with home made ornaments this year so I wanted something more homemade as my topper. This fits the bill. I folded 2 stars from 12 x 12 inch pieces of DCWV paper, then used pop dots at the top and 2 side points to keep the stars together. I just slipped it over the top, its light weight enough to just stay in place.

Find inspiration everywhere! Go... Create something fun & fabulous. Enjoy!

Wednesday, December 22, 2010

Matchbook mini recipe book


This is another matchbook mini like I posted here. It all started with some $1.00 cello bags decorated with snowmen, my faves! This one I decided to fill with recipes. Cold weather recipes. Chowders and stews and casseroles. Oh my! ;) 

I cut this shape for the front on my Cricut, using A child's year cartridge in my design studio. I then stamped it with CTMH alphabet and snowflake stamps in CTMH holiday red and star spangled blue inks. The piece de resistance (IMHO) I dotted here, there and everywhere with the CTMH glitz. I am loving that gorgeous stuff.

Now, I realize this is an odd photo. But I took it to illustrate the one complaint I had about the original design of the matchbook mini. In the original tutorial, the designer had the right hand end 1.5 inches wide while the left hand bound end was only .75 inch wide. I'm kinda a linear, matchy matchy, anal kind of gal. I couldn't get past that unevenness. So I changed this one. I like it a lot better. I totally get that most matchbooks are wider at the top fold. I understand that it also leaves more room for embellishment in a mini album. None of that mattered to my eye. I couldn't get past it, so I changed it.

This is the cello bag that started it all. Aren't they cute? I just love snowmen!

These are my simple recipe cards. I printed them on the computer, added some snowflake stamps and a cutie patootie lil tag used to pull the recipes out of the cello bags.

I am loving my stay-cation. A little bit of have to's and a whole lot of want to's going on this week. I'm hoping you are having fun with everything you are doing and preparing and creating this week. Merry Christmas!

Find inspiration everywhere! Go... Create something fun & fabulous. Enjoy!

Nugget purses and 4x4 gift cards


I have become slightly purse crazy, nugget purses that is. These lil cuties are quick and easy to whip up. I finally decided to decorate them with just a layering of prima flowers and snippets of ribbon to imitate leaves.


Next I decided to make some coordinating 4 x 4 inch note cards, from the scraps. My .cut file will cut 2 nugget purses from one 12 x 12 inch piece of paper, but there are two large scraps left. Perfect for card making.


Here is a close up of the purse with the card in the background. The inspiration for the card came from a new blog discovery for me. I am really enjoying oodabugalley.blogspot.com , the card inspiration came from  her 12-14-10 post, but you really have to just browse through her prior posts too. Very cute style and great inspiration spot.

So then I had to create some out of this paisley print.


Isn't it just the cutest?


And my hot pink daisies version. I am so hooked on these.


All of the papers were from different DCWV glitter stacks. They have a nice heavy weight to them and they add a nice glitz. I mean any girl who loves her purses, loves at least a little glitz right? Right. And chocolate. These hold 3 little Hershey's nuggets. Perfection.

I offered up this nugget purse .cut file a few days ago, so any one who would like it is certainly welcome. But be forewarned, they are cute, quick and addicting. Leave me a comment here, and I will email it to you.

Find inspiration everywhere! Go... Create something fun & fabulous. Enjoy!

Monday, December 20, 2010

Crafty exchange gifts

This evening I exchanged gifts with my dear friends from my office. We met after work and had dinner and great conversation and enjoyed sharing our creations with each other. Above is Brandy's packaging for her ornament. So pretty.

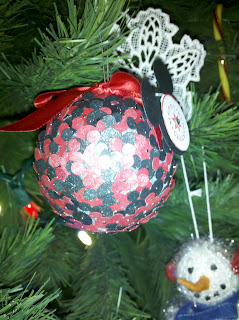
This is Brandy's ornament. It has thousands of mickey punches held on a styrofoam ball with applique pins. It has a gorgeous red satin ribbon and a larger mickey tag. The whole ornament is glimmer misted and shimmery. So fabulous!

This is Carmy's fabulous wrapping. Isn't this cute? Stamped and stickled and held closed with a candy cane.

Carmy made these from a potholder, folded in half and stitched. Add a button and use the hanging loop as the button loop now. Fabulous! It's already in my purse holding my driving glasses.

Here is 1 side of Carmy's ornament. The lighting doesn't do the glittery beauty justice.

Here is the backside. Another glittery stamped image, so pretty.


Ang made these ornaments by filling them with different ribbons. She used traditional colors specifically for my ornament because that is my fave. Red, green and gold. It's stunning.

Dana painted these darling snowbabies, and used socks as their caps. She is darling and fits right in, because snowmen are my fave Christmas decoration. This little lady will be very popular.

Saving the best for last. Magic cookie bars. My friend Barb is the best baker I know. She has huge crafty talents too, but she was feeling more confident of her baking skills. I'm so thankful! Of course I broke into them within minutes of arriving home, and they are delicious.
We all agreed this was the best Christmas exchange yet. Hopefully a great new tradition. Thanks gals for all the fun and new memories and beautiful decorations.

Find inspiration everywhere! Go... Create something fun & fabulous. Enjoy!

Pizza box wrapping for wood ornaments

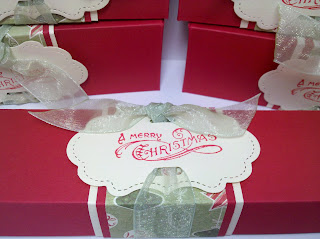
These are the boxes I created to box up my exchange ornaments. I created pizza boxes specifically designed for each ornament, by measuring the length and width adding 1 inch sides.

Then I made a belly band. Decorated with ribbon and the die cut label stamped with SU! sentiment.
I enjoyed creating these for my crafty friends. I hope each year they hang them on their tree's or around their homes they smile as they remember our friendship. They are treasures to me, each and every one. Thanks gals. 
Find inspiration everywhere! Go... Create something fun & fabulous. Enjoy!

Wood block ornaments


These are my exchange ornaments with my friends at work. They are made from SU! blocks that I stopped using a couple years ago. I have a couple of boxes full of these blocks and have been looking for a use for them. Voila! This is one great use.

I painted the blocks and distressed them in colors to coordinate with the CTMH Mistletoe papers I decided to use. I used double sided sticky tape between the blocks and then to stabilize them, I tightly wrapped ribbon all the way around the outside. But not until I had stapled on the hanging ribbon and the dangling ribbons holding the bells. The wrapped ribbon also hid the staples.


This was cut using Plantain school book.

This font is from the Don Juan cartridge.


I cant remember which cartridge I used to cut this font.

These were fun to make, I'm looking forward finding more uses for the unused blocks.


 Find inspiration everywhere! Go... Create something fun & fabulous. Enjoy!
Related Posts Plugin for WordPress, Blogger...